Difference between revisions of "Chapter 18 CC18"
(Chapter 18 Re-written for After Effects) |
(Screenshots) |
||
| Line 7: | Line 7: | ||
'''1.''' Open Adobe After Effects. Select “New Project…” in the startup menu. | '''1.''' Open Adobe After Effects. Select “New Project…” in the startup menu. | ||
| − | [[File: ]] | + | [[File:Fig18 Ex1 01 CC2018.png|800px]] |
| + | |||
'''2.''' Select “New Composition.” Name the Composition “ElementsofMotion.” Make sure the width is set to 1920 px and the height is set to 1080 px. The frame rate should be set to 29.97. For the Duration, set it to 1 second which is 0;00;01;00. Press OK. | '''2.''' Select “New Composition.” Name the Composition “ElementsofMotion.” Make sure the width is set to 1920 px and the height is set to 1080 px. The frame rate should be set to 29.97. For the Duration, set it to 1 second which is 0;00;01;00. Press OK. | ||
| − | [[File: ]] | + | |
| + | [[File:Fig18 Ex1 02 CC2018.png|500px]] | ||
| + | |||
'''3.''' From the Tools Panel at the top, select the Ellipse Tool. If you cannot find it, you can click and hold tools with a triangle pointing to the bottom right to reveal more tools. | '''3.''' From the Tools Panel at the top, select the Ellipse Tool. If you cannot find it, you can click and hold tools with a triangle pointing to the bottom right to reveal more tools. | ||
| − | [[File: ]] | + | [[File:Fig18 Ex1 03 CC2018.png|400px]] |
| + | |||
'''4.''' With the Ellipse Tool, create a circle on the left side of the composition by clicking and dragging while holding SHFT, to keep the circle uniform, and CMD,to keep the circle centered. Name this circle, “Left Circle.” | '''4.''' With the Ellipse Tool, create a circle on the left side of the composition by clicking and dragging while holding SHFT, to keep the circle uniform, and CMD,to keep the circle centered. Name this circle, “Left Circle.” | ||
| − | [[File: ]] | + | |
| + | [[File:Fig18 Ex1 04 CC2018.png|600px]] | ||
| + | |||
=Exercise 2: Scale, Effects and Keyframes= | =Exercise 2: Scale, Effects and Keyframes= | ||
'''1.''' Click on the pull-down menu next to Transform in the bottom left panel. | '''1.''' Click on the pull-down menu next to Transform in the bottom left panel. | ||
| − | [[File: ]] | + | |
| + | [[File:Fig18 Ex2 01 CC2018.png|400px]] | ||
| + | |||
'''2.''' Click and drag, to the left and right, on the blue number value next to “Anchor Point” to move the anchor point to the right of the circle. Alternatively, you can use the Anchor Point Tool (Y) to move the anchor point. | '''2.''' Click and drag, to the left and right, on the blue number value next to “Anchor Point” to move the anchor point to the right of the circle. Alternatively, you can use the Anchor Point Tool (Y) to move the anchor point. | ||
| − | [[File: ]] | + | [[File:Fig18 Ex2 02 CC2018.png|800px]] |
| + | |||
'''3.''' Make sure you are in the first frame in the Timeline. The blue slider should be all the way to the left. If not, click and drag the slider to the left. | '''3.''' Make sure you are in the first frame in the Timeline. The blue slider should be all the way to the left. If not, click and drag the slider to the left. | ||
'''4.''' Next to Scale there is a stop watch. Click on it to create a keyframe. This will tell After Effects that at the first frame, the circle is at 100% size. | '''4.''' Next to Scale there is a stop watch. Click on it to create a keyframe. This will tell After Effects that at the first frame, the circle is at 100% size. | ||
| − | [[File: ]] | + | [[File:Fig18 Ex2 04 CC2018.png|600px]] |
| + | |||
'''5.''' Now move the slider in the timeline to the last frame | '''5.''' Now move the slider in the timeline to the last frame | ||
| − | [[File: ]] | + | [[File:Fig18 Ex2 05 CC2018.png|800px]] |
| + | |||
'''6.''' Next to Scale, click and drag the value to the right to increase the size of the circle. Increase the size until it is almost off the composition. | '''6.''' Next to Scale, click and drag the value to the right to increase the size of the circle. Increase the size until it is almost off the composition. | ||
| − | [[File: ]] | + | [[File:Fig18 Ex2 05 CC2018.png|800px]] |
| + | |||
'''7.''' To preview the composition, press SPACE. Keep in mind that the slider will stop at the frame where you pause the preview. | '''7.''' To preview the composition, press SPACE. Keep in mind that the slider will stop at the frame where you pause the preview. | ||
'''8.''' Make the “Left Circle” layer active by selecting it. Make a copy of it by selecting Edit > Copy then Edit > Paste. Name the new layer “Right Circle.” | '''8.''' Make the “Left Circle” layer active by selecting it. Make a copy of it by selecting Edit > Copy then Edit > Paste. Name the new layer “Right Circle.” | ||
| − | [[File: ]] | + | [[File:Fig18 Ex2 05 CC2018.png|800px]] |
| + | |||
'''9.''' Click on the pull-down menu for “Right Circle” and click the pull-down menu for “Transform.” Change the value of the Rotation to 0x+180.0, which will rotate the circle to the right side of the composition. You can either type in the value or click and drag from the blue value. | '''9.''' Click on the pull-down menu for “Right Circle” and click the pull-down menu for “Transform.” Change the value of the Rotation to 0x+180.0, which will rotate the circle to the right side of the composition. You can either type in the value or click and drag from the blue value. | ||
| − | [[File: ]] | + | [[File:Fig18 Ex2 05 CC2018.png|800px]] |
| + | |||
'''10.''' Press SPACE to preview. You should now have two circles that increase in size. | '''10.''' Press SPACE to preview. You should now have two circles that increase in size. | ||
| Line 50: | Line 64: | ||
'''1.''' Move the slider to the first frame in the timeline if it is not and select the “Left Circle” layer. Next to Opacity, click the stopwatch to create a keyframe. | '''1.''' Move the slider to the first frame in the timeline if it is not and select the “Left Circle” layer. Next to Opacity, click the stopwatch to create a keyframe. | ||
| − | [[File: ]] | + | [[File:Fig18 Ex3 01 CC2018.png|800px]] |
| + | |||
'''2.''' Move to the last frame in the timeline and change the value of Opacity to 0%. | '''2.''' Move to the last frame in the timeline and change the value of Opacity to 0%. | ||
| − | [[File: ]] | + | [[File:Fig18 Ex3 02 CC2018.png|800px]] |
| + | |||
'''3.''' Do the same for right circle. | '''3.''' Do the same for right circle. | ||
'''4.''' Press SPACE to preview. You should have two circles that grow in size and fade out. | '''4.''' Press SPACE to preview. You should have two circles that grow in size and fade out. | ||
Revision as of 19:43, 30 September 2018
Chapter 18 - Elements of Motion
Formal design relationships we have created in still compositions are also active in animations. Repetition, symmetry, asymmetry, balance, and rhythm become enveloped in a new formal element: time. In the visual examples, forms are reused to create unity between different moments in the animation. At the same time, transformations of scale, color, and value create contrast, which helps differentiate moments in the animation. Early experimental animation kept time visually with abstract shapes. Pacing is key to Hans Richter’s film, Rhytmus 21 (1921). With the most simple forms Richter was able to explore the transformations of shapes over time through size. Everything is understood through an even, consistent pace, which leads to a contemplation of the purity of form.
In the 1970s, Lillian Schwartz made cutting edge experimental computer animations at Bell Labs. Her work may look like the earlier Richter animation, but the video was programmed using a computer. Her process was similar to our exercises. In her 1971 animation UFO’s the introduction of the computer results in faster edits and elemental shapes. The psychedelic aesthetics fit the topic.
Exercise 1: Understanding After Effects Interface and Creating Solid Shapes
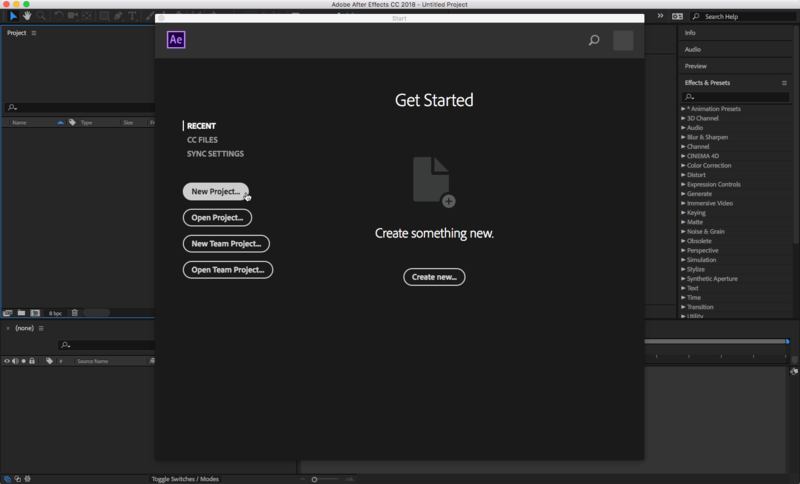
1. Open Adobe After Effects. Select “New Project…” in the startup menu.
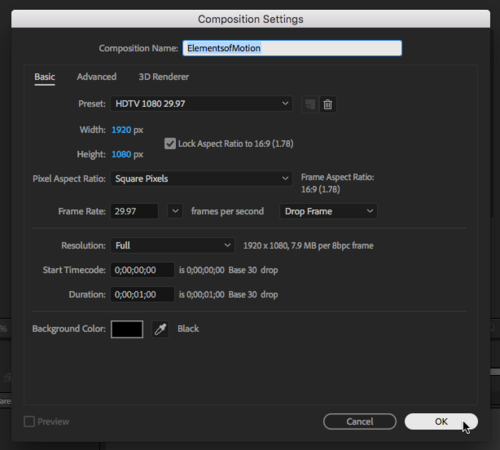
2. Select “New Composition.” Name the Composition “ElementsofMotion.” Make sure the width is set to 1920 px and the height is set to 1080 px. The frame rate should be set to 29.97. For the Duration, set it to 1 second which is 0;00;01;00. Press OK.
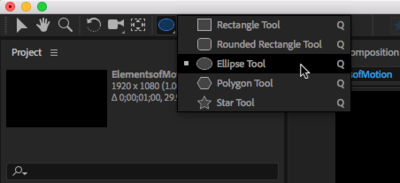
3. From the Tools Panel at the top, select the Ellipse Tool. If you cannot find it, you can click and hold tools with a triangle pointing to the bottom right to reveal more tools.
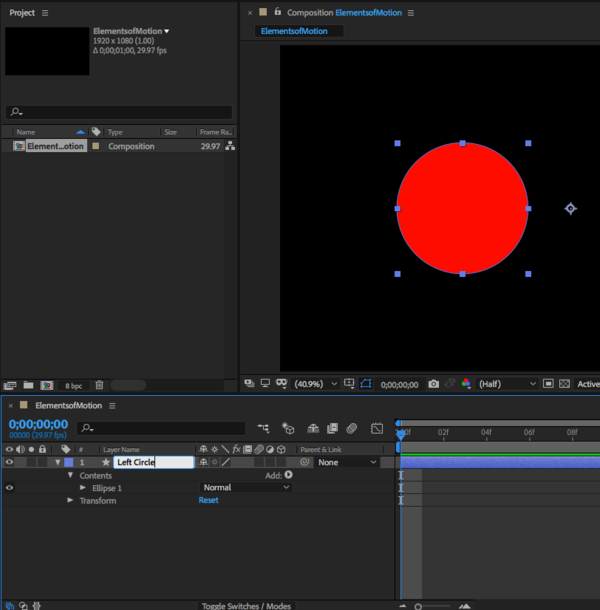
4. With the Ellipse Tool, create a circle on the left side of the composition by clicking and dragging while holding SHFT, to keep the circle uniform, and CMD,to keep the circle centered. Name this circle, “Left Circle.”
Exercise 2: Scale, Effects and Keyframes
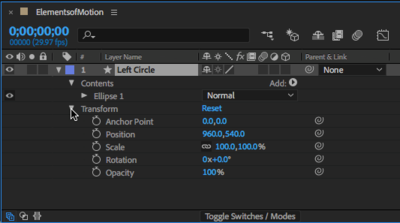
1. Click on the pull-down menu next to Transform in the bottom left panel.
2. Click and drag, to the left and right, on the blue number value next to “Anchor Point” to move the anchor point to the right of the circle. Alternatively, you can use the Anchor Point Tool (Y) to move the anchor point.
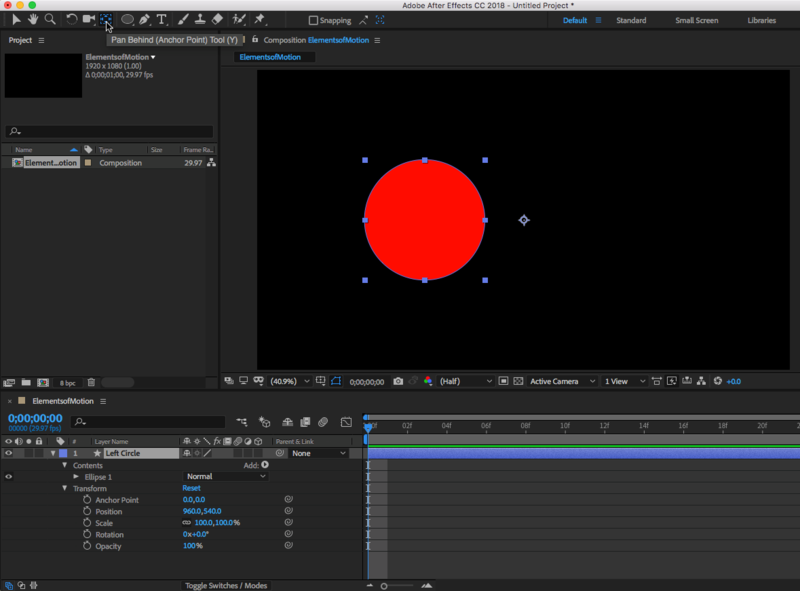
3. Make sure you are in the first frame in the Timeline. The blue slider should be all the way to the left. If not, click and drag the slider to the left.
4. Next to Scale there is a stop watch. Click on it to create a keyframe. This will tell After Effects that at the first frame, the circle is at 100% size.
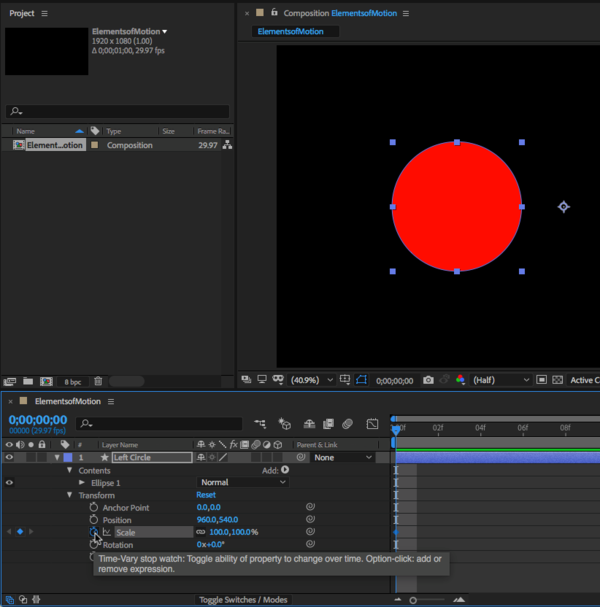
5. Now move the slider in the timeline to the last frame
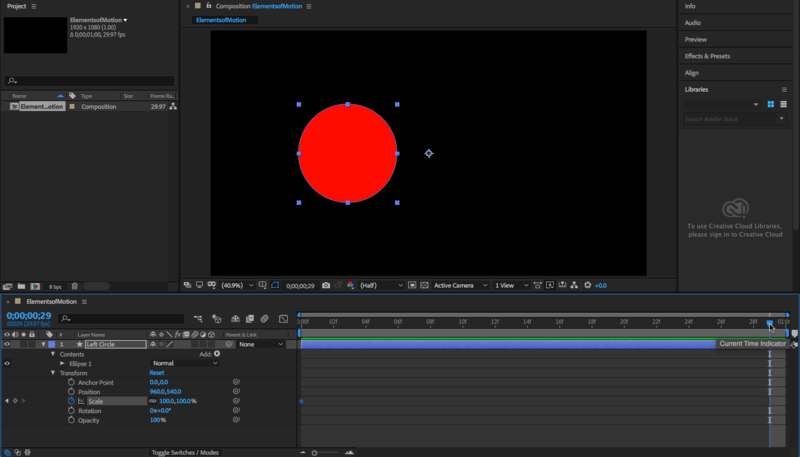
6. Next to Scale, click and drag the value to the right to increase the size of the circle. Increase the size until it is almost off the composition.

7. To preview the composition, press SPACE. Keep in mind that the slider will stop at the frame where you pause the preview.
8. Make the “Left Circle” layer active by selecting it. Make a copy of it by selecting Edit > Copy then Edit > Paste. Name the new layer “Right Circle.”

9. Click on the pull-down menu for “Right Circle” and click the pull-down menu for “Transform.” Change the value of the Rotation to 0x+180.0, which will rotate the circle to the right side of the composition. You can either type in the value or click and drag from the blue value.

10. Press SPACE to preview. You should now have two circles that increase in size.
Exercise 3: Opacity
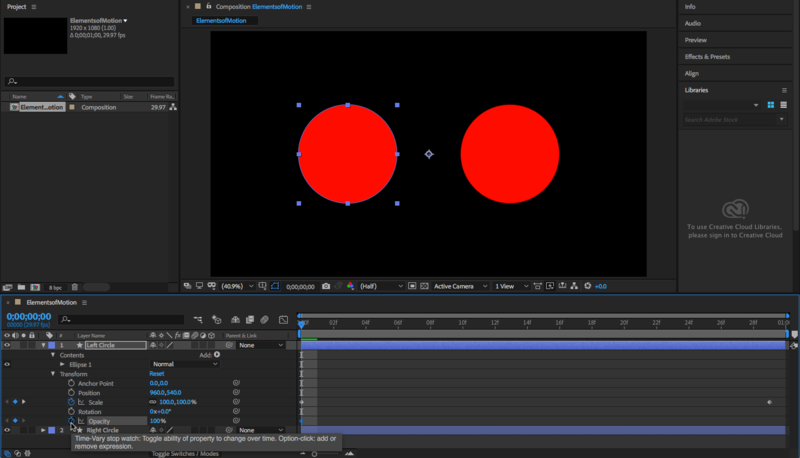
1. Move the slider to the first frame in the timeline if it is not and select the “Left Circle” layer. Next to Opacity, click the stopwatch to create a keyframe.
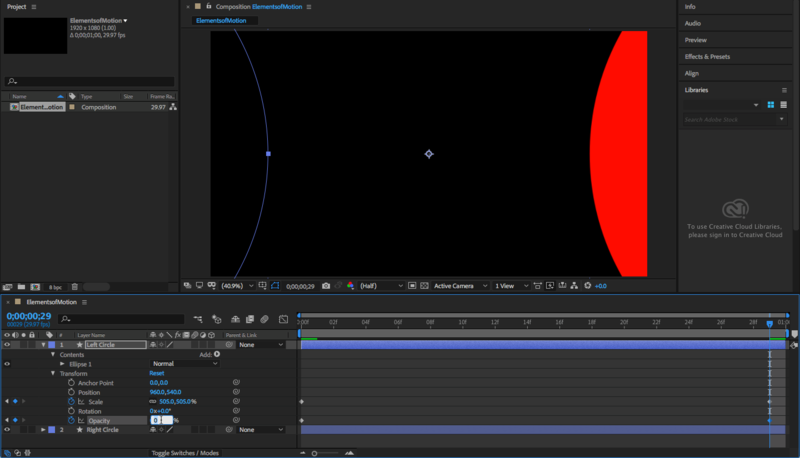
2. Move to the last frame in the timeline and change the value of Opacity to 0%.
3. Do the same for right circle.
4. Press SPACE to preview. You should have two circles that grow in size and fade out.
