Difference between revisions of "Chapter 7 CC18"
(Copied from CS6) |
|||
| Line 24: | Line 24: | ||
Scanners are hardware devices that use scanner software to send the captured image from the scanning bed to the computer hard drive. All flatbed scanners operate in the same manner, but the scanning software varies among various brands. In this exercise, the basic ideas of scanning, resolution and file size will be addressed. | Scanners are hardware devices that use scanner software to send the captured image from the scanning bed to the computer hard drive. All flatbed scanners operate in the same manner, but the scanning software varies among various brands. In this exercise, the basic ideas of scanning, resolution and file size will be addressed. | ||
| − | 1. Typically, a scanner is used to create a digital image of a printed work. In this exercise, a scan will be made of a three-dimensional object. Place your object on the scanning bed. If the lid does not close, put a dark piece of cloth around the scanner so the light from the device doesn’t bounce out of the surface of the scanner (a jacket or dark sweater will work). We are scanning a flower from an orchid - it lays flat so it will be easy to close the lid on the scanner. | + | '''1.''' Typically, a scanner is used to create a digital image of a printed work. In this exercise, a scan will be made of a three-dimensional object. Place your object on the scanning bed. If the lid does not close, put a dark piece of cloth around the scanner so the light from the device doesn’t bounce out of the surface of the scanner (a jacket or dark sweater will work). We are scanning a flower from an orchid - it lays flat so it will be easy to close the lid on the scanner. |
| − | 2. Open the scanning application. On the Canon scanners in the labs where we teach, the application automatically opens through Image Capture (a Macintosh application that is useful for capturing digital images from scanners and digital cameras), located in | + | '''2.''' Open the scanning application. On the Canon scanners in the labs where we teach, the application automatically opens through Image Capture (a Macintosh application that is useful for capturing digital images from scanners and digital cameras), located in Finder > Applications > Image Capture. Here we will use Preview, however the following steps can also be performed in Photoshop which we demonstrate at the end of this exercise. Open Preview and click File then click on the scanner plugged in to your computer. It should say "Import from 'scanner'." |
[[File:Fig07_Ex1_01_CS6.png]] | [[File:Fig07_Ex1_01_CS6.png]] | ||
| − | 3. The scanner may automatically create a preview of whatever is placed on the scan bed | + | '''3.''' The scanner may automatically create a preview of whatever is placed on the scan bed. If a preview does not happen when the application is launched, look for a button to create a preview (it is often labeled, “preview”, "overview", “view” or “prescan”). |
| + | |||
[[File:Fig07_Ex1_03_CS6.png|400px]] | [[File:Fig07_Ex1_03_CS6.png|400px]] | ||
| − | ''As a result of clicking on the "Overview" button in the bottom | + | ''As a result of clicking on the "Overview" button in the bottom area of the scanning application, the size of the flower is small in comparison to the entire scan bed.'' |
| − | 4. The scanner will digitally capture the entire flatbed area. If your object is smaller than the flatbed, select just the area that you want to digitize by marqueeing (clicking and dragging with a selection tool - on most scanners just click and drag) over the image area. In Preview, part of the scan will be selected after pressing overview. You can adjust the size of the selection by dragging the corners to fit your image. You may have to look for a selection tool in order to constrain the area of the scan to just the image area on the flatbed. At this point, your selection designates the location of the object on the flatbed. If you lift the lid and move the object, you will have to re-preview the digital file in order to adjust the selected area. | + | '''4.''' The scanner will digitally capture the entire flatbed area. If your object is smaller than the flatbed, select just the area that you want to digitize by marqueeing (clicking and dragging with a selection tool - on most scanners just click and drag) over the image area. In Preview, part of the scan will be selected after pressing overview. You can adjust the size of the selection by dragging the corners to fit your image. You may have to look for a selection tool in order to constrain the area of the scan to just the image area on the flatbed. At this point, your selection designates the location of the object on the flatbed. If you lift the lid and move the object, you will have to re-preview the digital file in order to adjust the selected area. |
[[File:Fig07_Ex1_04_CS6.png|400px]] | [[File:Fig07_Ex1_04_CS6.png|400px]] | ||
| Line 42: | Line 43: | ||
''Notice the selection edges are very close to the edges of the flower on the scanning bed.'' | ''Notice the selection edges are very close to the edges of the flower on the scanning bed.'' | ||
| − | 5. This is the crucial step. Before scanning the selected area, the artist must decide upon the final file resolution. The resolution specifically accounts for how many pixels are present in one inch of the digital file. | + | '''5.''' This is the crucial step. Before scanning the selected area, the artist must decide upon the final file resolution. The resolution specifically accounts for how many pixels are present in one inch of the digital file. |
''Resolution for printed images'' | ''Resolution for printed images'' | ||
| Line 57: | Line 58: | ||
In Preview after resizing the selection, the size of your final image is displayed next to the scan preview. Our image is roughly 3 by 3 inches. This is important information, as it will help me to determine what resolution I will use when I scan the file.'' | In Preview after resizing the selection, the size of your final image is displayed next to the scan preview. Our image is roughly 3 by 3 inches. This is important information, as it will help me to determine what resolution I will use when I scan the file.'' | ||
| − | 6. Use the guidelines above, choose a resolution and be sure that the color mode is appropriate (black and white line art, grayscale or color). | + | '''6.''' Use the guidelines above, choose a resolution and be sure that the color mode is appropriate (black and white line art, grayscale or color). |
[[File:Fig07_Ex1_06_CS6.png|400px]] | [[File:Fig07_Ex1_06_CS6.png|400px]] | ||
| Line 64: | Line 65: | ||
I know that I will be able to make a very good print of this scan at close to 6 by 6 inches, or the width and height multiplied by 2.'' | I know that I will be able to make a very good print of this scan at close to 6 by 6 inches, or the width and height multiplied by 2.'' | ||
| − | 7. Finally, choose a file format for saving the scan. File formats such as JPEG, PNG, and PDF are used to compress the size of the file, and therefore often result in a loss of digital information. File formats such as TIFF and PSD are less “lossy” (the image does not lose digital information due to compression), and are therefore better format choices if the intent is to manipulate the image in an editing program such as Photoshop. | + | '''7.''' Finally, choose a file format for saving the scan. File formats such as JPEG, PNG, and PDF are used to compress the size of the file, and therefore often result in a loss of digital information. File formats such as TIFF and PSD are less “lossy” (the image does not lose digital information due to compression), and are therefore better format choices if the intent is to manipulate the image in an editing program such as Photoshop. |
[[File:Fig07_Ex1_07_CS6.png|400px]] | [[File:Fig07_Ex1_07_CS6.png|400px]] | ||
| Line 70: | Line 71: | ||
''Here is my final TIFF file as seen in Preview. I will be opening this file in Photoshop for the next exercise.'' | ''Here is my final TIFF file as seen in Preview. I will be opening this file in Photoshop for the next exercise.'' | ||
| − | 8. The last step is to click on a button that reads | + | '''8.''' The last step is to click on a button that reads “scan” in order to create the digital scanogram image file. |
==Scanning in Photoshop== | ==Scanning in Photoshop== | ||
Revision as of 11:29, 18 July 2018
Download Materials for Chapter 7
Click here to download chapter 7 work files.
Chapter 7: Scanning
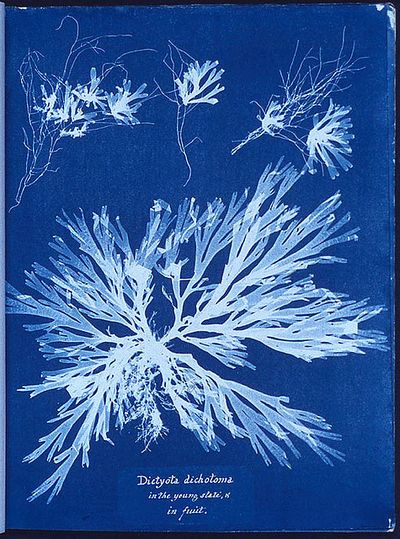
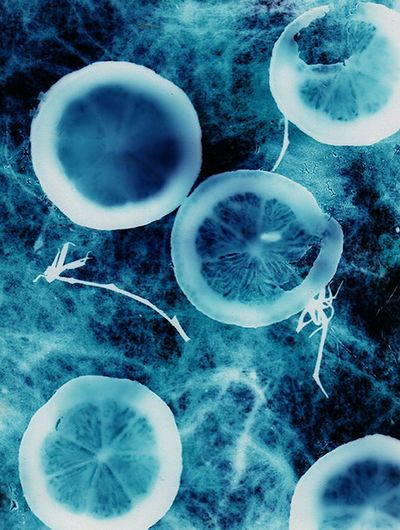
A scanogram is the digital method of producing a “contact” image, reminiscent of a photogram. The first photograms were made by photographic pioneers, William Henry Fox Talbot and Anna Atkins in the mid-1800s. Photograms are made by placing objects on sensitized paper, exposing the objects and paper to light, and processing the paper to reveal the print. A camera is not necessary for the production of this type of graphic image; and the result is more like an abstract impression of the object than a highly detailed rendering. Like a photogram, a scanogram is made by placing objects on the “sensitized area,” or the scan bed, where the surface is exposed to the digital capturing devices that generate a file.
Photograms have been made by artists (see Anna Atkins’ renderings of natural elements or Man Ray, Lissitzky and Moholy-Nagy's collages) and by commercial designers (see Paul Rand’s package design and book jackets). The process is fun to explore, because the result always differs from the artist’s expectations.
IMAGE: http://flickr.com/photos/digitalfoundations/2435115622/
Caption: A Photogram of Algae, Anna Atkins from, British Algae, 1843, the first book composed entirely of photographic images.
IMAGE: http://flickr.com/photos/digitalfoundations/2434298019/
Caption: A photogram of lemons, uploaded to Wikimedia Commons in August 2005 by user name Cormaggio.
Exercise 1: Creating a scanogram and understanding file resolution
Scanners are hardware devices that use scanner software to send the captured image from the scanning bed to the computer hard drive. All flatbed scanners operate in the same manner, but the scanning software varies among various brands. In this exercise, the basic ideas of scanning, resolution and file size will be addressed.
1. Typically, a scanner is used to create a digital image of a printed work. In this exercise, a scan will be made of a three-dimensional object. Place your object on the scanning bed. If the lid does not close, put a dark piece of cloth around the scanner so the light from the device doesn’t bounce out of the surface of the scanner (a jacket or dark sweater will work). We are scanning a flower from an orchid - it lays flat so it will be easy to close the lid on the scanner.
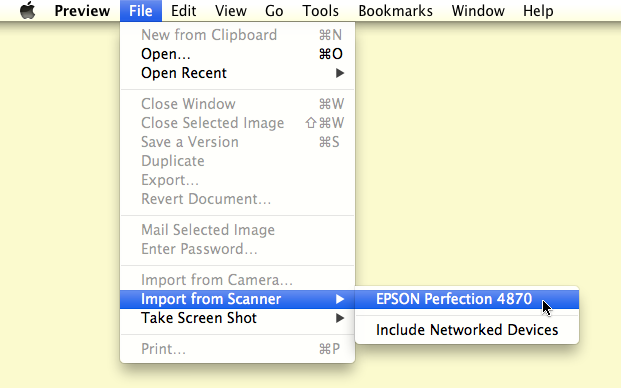
2. Open the scanning application. On the Canon scanners in the labs where we teach, the application automatically opens through Image Capture (a Macintosh application that is useful for capturing digital images from scanners and digital cameras), located in Finder > Applications > Image Capture. Here we will use Preview, however the following steps can also be performed in Photoshop which we demonstrate at the end of this exercise. Open Preview and click File then click on the scanner plugged in to your computer. It should say "Import from 'scanner'."
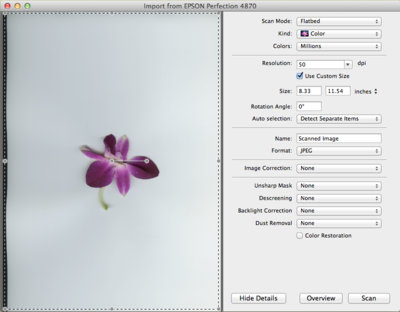
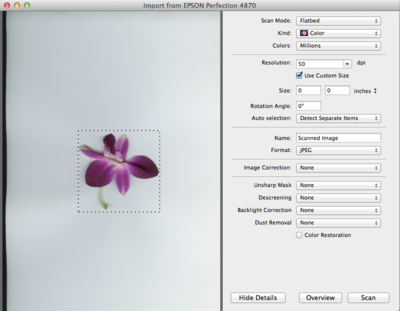
3. The scanner may automatically create a preview of whatever is placed on the scan bed. If a preview does not happen when the application is launched, look for a button to create a preview (it is often labeled, “preview”, "overview", “view” or “prescan”).
As a result of clicking on the "Overview" button in the bottom area of the scanning application, the size of the flower is small in comparison to the entire scan bed.
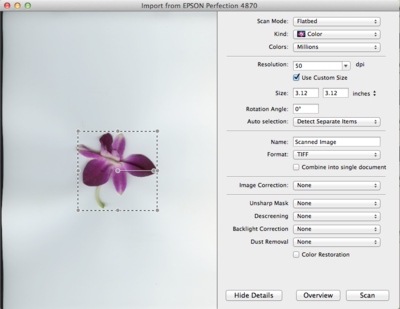
4. The scanner will digitally capture the entire flatbed area. If your object is smaller than the flatbed, select just the area that you want to digitize by marqueeing (clicking and dragging with a selection tool - on most scanners just click and drag) over the image area. In Preview, part of the scan will be selected after pressing overview. You can adjust the size of the selection by dragging the corners to fit your image. You may have to look for a selection tool in order to constrain the area of the scan to just the image area on the flatbed. At this point, your selection designates the location of the object on the flatbed. If you lift the lid and move the object, you will have to re-preview the digital file in order to adjust the selected area.
Notice the selection edges are very close to the edges of the flower on the scanning bed.
5. This is the crucial step. Before scanning the selected area, the artist must decide upon the final file resolution. The resolution specifically accounts for how many pixels are present in one inch of the digital file.
Resolution for printed images
Resolution is measured in dots or pixels per inch (dpi or ppi). The resolution of the scanned image is a necessary factor in the final print or on-screen output. In consumer or prosumer situations, such as personal ink jet printers or laser printers at stores like Kinkos or Costco, the print will look fine at a resolution of 200 to 300 dots per inch. In professional print environments, the rule is simple: ask the printer for the print specifications including file resolution and color space.
Resolution for screen presentations Any image that will be used on-screen, for instance on a website or in a video, will need to be saved only at screen resolution, or 72 dots per inch. The file size is directly connected to the amount of pixels saved in each inch of the bitmap or raster file. Image files saved at screen resolution are much smaller in file size than images that are saved for printing.
To determine the resolution to enter into the scanner software, simply acknowledge the size of the object on the flatbed, then decide how large you want the object to print on the page. If the object is, for example, 4 by 5 inches and the objective is to make a 4 by 5 inch print, scan the object at 200 – 300 dots per inch. If you want to make an 8 by 10 inch print, either scan the object at 300 dpi and increase the scale to 200 percent, or scan the object at 600 dpi at 100 percent scale.
In Preview after resizing the selection, the size of your final image is displayed next to the scan preview. Our image is roughly 3 by 3 inches. This is important information, as it will help me to determine what resolution I will use when I scan the file.
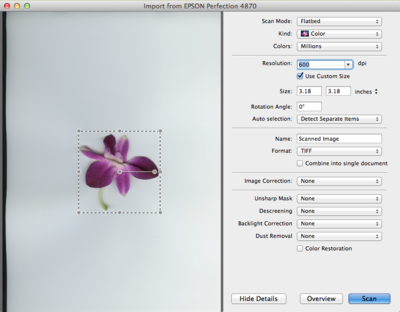
6. Use the guidelines above, choose a resolution and be sure that the color mode is appropriate (black and white line art, grayscale or color).
Here you can see that I am scanning at 600 dots per inch. I know that I can make a very good print on my ink jet printer at 300 dots per inch. Since 300 multiplied by 2 is 600, I know that I will be able to make a very good print of this scan at close to 6 by 6 inches, or the width and height multiplied by 2.
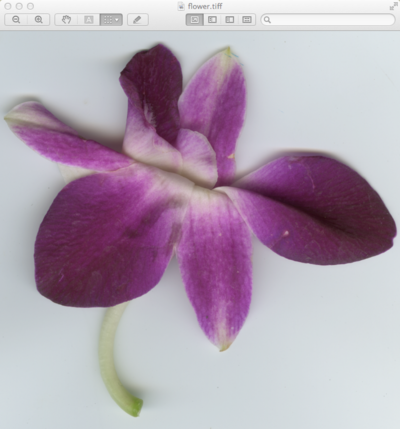
7. Finally, choose a file format for saving the scan. File formats such as JPEG, PNG, and PDF are used to compress the size of the file, and therefore often result in a loss of digital information. File formats such as TIFF and PSD are less “lossy” (the image does not lose digital information due to compression), and are therefore better format choices if the intent is to manipulate the image in an editing program such as Photoshop.
Here is my final TIFF file as seen in Preview. I will be opening this file in Photoshop for the next exercise.
8. The last step is to click on a button that reads “scan” in order to create the digital scanogram image file.
Scanning in Photoshop
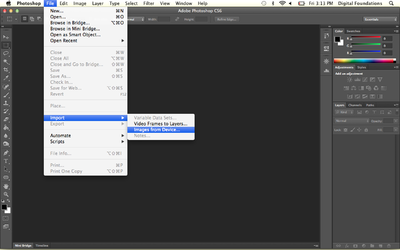
To scan an image in Photoshop, click File > Import > Images From Device.
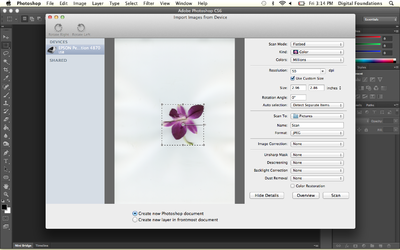
A dialog box will appear where you will be able to perform steps 3 through 8 from Exercise 1.
Exercise 2: A brief tour of tools and palettes in Photoshop
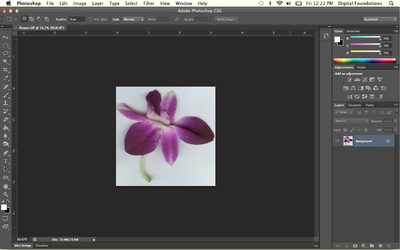
1. Open the scanogram file in Photoshop by dragging it to the Photoshop icon in the dock or using File>Open from within Photoshop. Set the default workspace by clicking on Window > Default Workspace. Notice that the tools are located in the Tool Palette on the left side of the screen. The arrow at the top of the palette can be used to view the tools in a single or double column.
| In the Creative Suite programs, palettes are accessible from the Window menu. |
2. Click once on any tool and notice the Options Palette at the top of the screen. All tools have specific options that are used to determine how each tool functions.
The Rectangular Marquee Tool was selected in the Tool Palette. This is an image of the Options Palette, located under the menus at the top of the screen. When a different tool is selected, its options are shown in this palette.
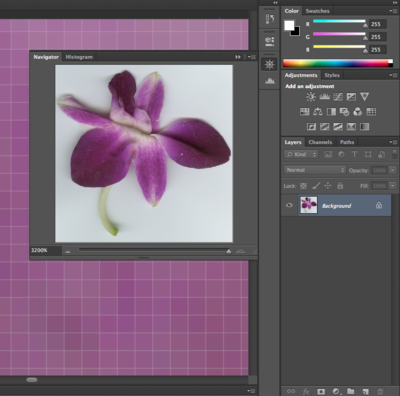
3. Palettes are also seen on the right side of the screen. All palettes can be hidden or displayed by using the Window menu. The Navigator Palette can be used to explore various areas of an image. The larger the resolution or file size, the more likely it is that the whole image will not be viewable on the screen at 100 percent. The navigator can be used to move around within a large image, but you will soon learn short-cut keys to avoid this palette. This is worthwhile because the fewer palettes that you need to keep open on your screen results in more screen space for viewing image details! Push the slider on the bottom of the Navigator Palette all the way to the right to zoom all the way in to the image.
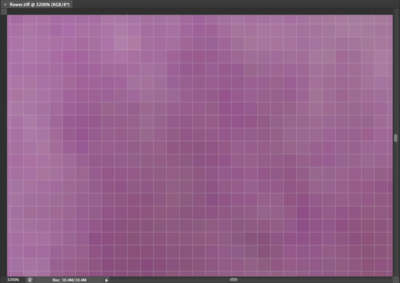
'The small red square in the Navigator Palette indicates which part of the image is viewable on screen. Notice the slider is pushed all the way to the right, and in the bottom left corner we are zoomed in to 3200 percent.
4. Enlarge the view of the image by zooming in and the individual pixels that comprise the image are in plain view.
A pixel is the most basic picture element, or a single color unit of the bitmapped digital image file. That last sentence was full of jargon. Let's revisit those words:
Pixel
The word pixel is a combination of two shortened words: picture and element. Each pixel is one unit of color information. Pixels only exist when a real-world object is scanned or captured digitally.
Bitmapped or Rasterized
A digital file is considered bitmap or raster (two words used interchangeably) if it is comprised of pixels. The alternative is a vector file, where the image is made of mathematical coordinates whose relationships define areas of mass and contour. Adobe Illustrator is a vector-based application. Photoshop, which is primarily used to work on photographic images, is commonly thought of as a bitmap or raster application. If the real world is captured digitally, it is converted into pixels.
5. Double-click the Zoom Tool in the Tool Palette to see the image at 100%. It is important to view digital images at 100% as this is the “true” representation of the file. This is as good as it gets on the screen.
| Hot key: CMD+0 will change the viewing percentage so the image is as large as it can be on your screen. This hot key works in all of the CS3 applications. |
Notice that the Zoom Tool options includes a zoom out button (Zoom Tool with a minus sign). Click on this and then click anywhere within the image. Keep clicking and you will continue to zoom out of the image. The button, "Actual Size," will also put the file at 100%. The button, "Fit Screen," will make the image as large as it can be viewed on your screen.
6. Double-click the Hand Tool to see the image as large as it can be within your particular monitor settings. Now we'll try some key commands. Zoom in more than 100% by using CMD+= and then use the Spacebar key (SPCE) to access the Hand Tool. Hold SPCE and use the mouse to click and drag on the image. This moves the image around within the workspace, much like using the scroll bars at the edges of the document. In Photoshop, you will never use the scroll bars because you will always use the Hand Tool.
| Hot key: Holding the spacebar on the keypad changes most tools to the Hand Tool. This is useful for quick, temporary access to the Hand Tool. |
Exercise 3: Image Size, file size, and resolution
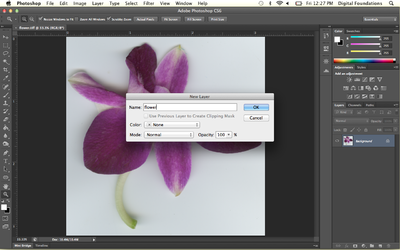
1. When an image or object is scanned or input from a digital camera, it appears in the Layers Palette as “Background Layer.” Look in the Layers Palette (Window > Layers) and notice that the background layer is locked. Double-click on the words “Background Layer” in the Layers Palette to use the Rename Layer dialog box. When you rename the layer it is automatically unlocked.
A layer is like a single sheet of transparency paper. A “blank” or empty layer is transparent. When a scan or digital photograph is first opened, it lives on the “Background” layer. Layers can be added and deleted using this palette. Unlocking the background layer is a good habit, as it encourages the user to rename the layer (which is always a good idea) and enables the layer to be affected by tools and effects that can be “locked out” when the layer is locked.
| Tip: Double-clicking on the icon of the layer will open the Layer Style dialog box. If this happens, hit Cancel, then try again by double-clicking specifically on the name of the layer. |
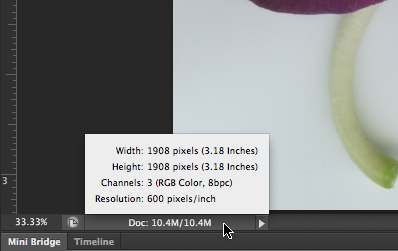
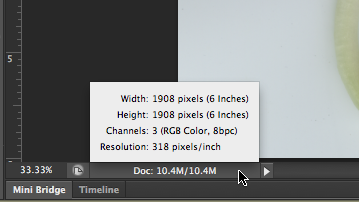
2. The Status Bar runs along the bottom of the file. Click on the area of the Status Bar that reads, “Doc:” followed by a number in kilobytes or megabytes. This area reports the file size. To see a visual representation of the printed size of the digital file, click on this area. You will see a rectangular box around a second box with an X placed inside of it. The outer box represents the overall page size (this is determined by the page size set in File > Page Set Up. By default it is letter size or 8.5 by 11 inches). The inner box represents the size of the image on the page.
Click on the status bar to see the overall size of the print on the page. Our print would be very small at the current file settings.
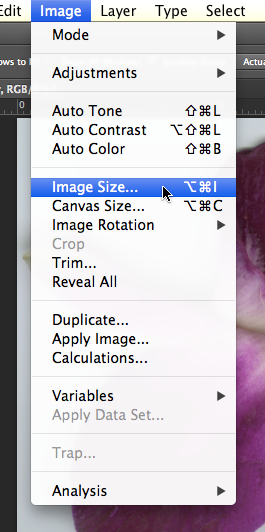
3. Click Image > Image Size to see the resolution of the image.
4. Our scan (Fig07_flower_CS6.psd) is about 3 by 3 inches at 600 dots (on the print) or pixels (on the screen) per inch.
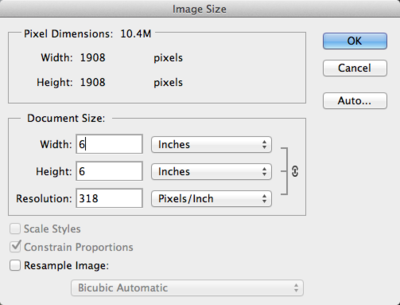
5. Uncheck “Resample Image” if it is checked, so that Width, Height, and Resolution appear linked together. Notice that the pixel dimensions at the top of the Image Size Dialog Box are no longer editable fields. The pixel dimensions will not change if a change is made to the editable areas beneath "Document Size." Modifying any one of the variables, Width, Height, or Resolution, results in corresponding changes to the other two variables. I set my height at 6 inches. This resulted in a width of 6 inches and a resolution of approximately 318 dpi. A print made at 318 dpi on my personal ink jet printer will be fine, that is, it will not be blurry or pixelated.
Using the Image Size dialog box with “Resample Image” unchecked enables the user to change the dimensions of the printed image or the resolution (dpi) without changing the overall number of pixels in the digital file. This is a good thing – you would never want to change the amount of pixels within the image, unless you simply want to delete some pixels in order to make the file size smaller. Pixels are created during the scanning process, on a scan bed or within the digital camera. The only way to make “new” pixels is to rescan or re-capture the digital file using a higher resolution. It is not possible to create new pixels inside Photoshop after the fact. OK, that’s actually a lie. You can make new pixels, but you never want to. If Photoshop resamples the image (or, makes new pixels based on the surrounding pixels) the result is a blurry or pixelated image.
6. Click OK. Notice that nothing seems to happen to your file on the screen. This is because there was no change made to the actual number of pixels in the file. What changed is the amount of pixels that will be printed in one inch when the image is printed. Use the Status Bar to examine the result of changing the dpi in the Image Size dialog box while the option Resample Image was not selected. By nearly halving the resolution, the dimensions of the printed image have doubled. The size of the file is the same.
Clicking in the Status Bar area demonstrates that my scan will print at a much larger size than it would have printed before I changed my resolution settings in the Image Size dialog box.
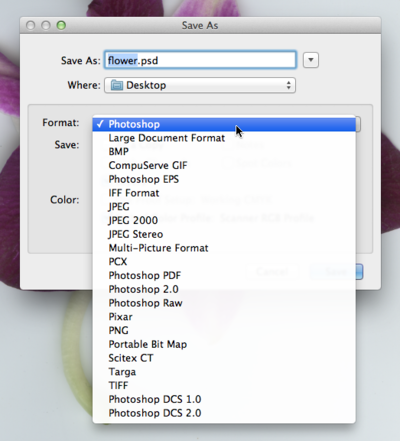
7. Choose File>Save As to change the format of the file from Tiff to Photoshop. The name of the file does not have to change, as a new format will create a new file. Always save using the native or master format.
Exercise 4: Basic adjustments to contrast, hue and saturation levels
In this exercise we will make adjustments to the contrast, hue and saturation of the scanogram. The methods utilized in this exercise are basic, that is, they are less specific than professional methods for color correction. However, the scanogram creates an image with great density in the shadow areas and overexposed highlights. The range of mid-tone values is usually discreet. As a result, these basic adjustments are easily seen and properly utilized on this type of image file. In this exercise, how the image “feels” is more significant than the details in the specific highlight and shadow areas. Advanced image adjustments are explored in chapters 8 and 9.
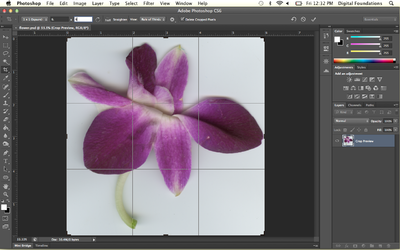
1. To start, crop the image so that it is exactly 3 by 4 inches. Click on the Crop Tool in the Tool Palette, then use the Options Palette to set the Crop Tool to make a crop at exactly 3 by 4 inches. Click and drag with the Crop Tool over the image. When most of the image is selected, as in our illustration below, click Return or Enter on your keypad to finalize the crop.
2. Double-check the width, height and resolution in the Image Size dialog box.
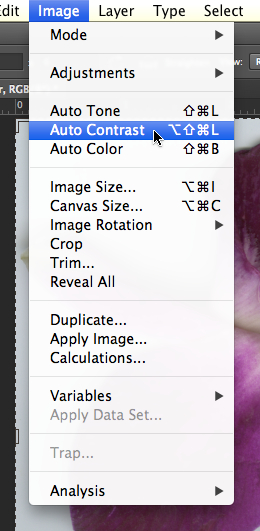
3. Click Image > Auto Contrast to automatically adjust the contrast within the image file.
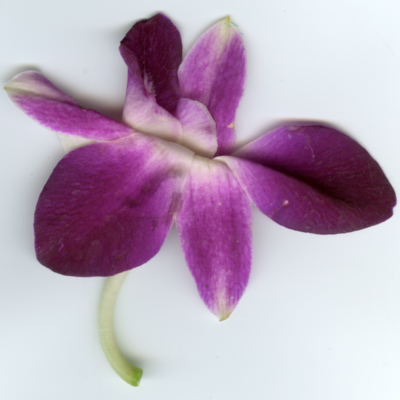
Before and after Auto Contrast was applied to the image file.
4. Press CMD+Z on the keypad to “undo” the last step. Press CMD+Z again and Photoshop "redoes" the last step. In Illustrator, CMD+Z continuously undoes previous steps. In Photoshop, the History Palette serves this purpose. We'll explore the History Palette in the next few steps.
| Tip: The menu item for "Undo" is Edit > Undo. It is almost not even worth mentioning as you are best off knowing the hotkeys for this important Photoshop command. |
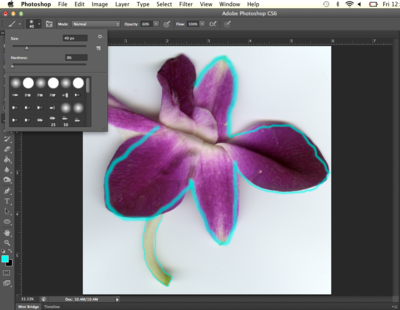
5. Click on the Brush tool and make five random marks with it on the image. Press CMD+Z two times and you will still have five random brush marks on top of the scanogram.
The Brush Tool is selected in the Tool Palette. The Brush Options can be used to select a brush size, a hard or soft edge on the brush, and the opacity of the hue that the brush draws (look towards the top right area of the Brush Tool Options).
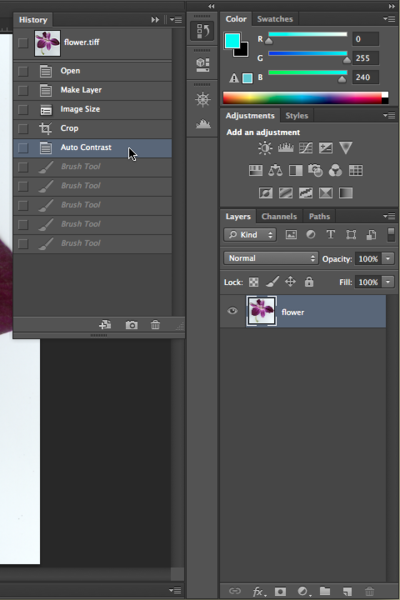
6. Click on the History Palette (Window > History) and notice that it says, "Brush Tool" for each of the times that the paintbrush was used. Click once on each step in order to travel backwards through time. Just clicking on the step is “enough,” that is, nothing needs to be clicked in order to confirm that this is where you want to start working – just, start working and a new step will be recorded in the History Palette. Click on the step in the History Palette that restores the image to the point after Auto-Contrast was applied.
In the History Palette, clicking on the step just above the five brush strokes, on "Auto Contrast" is the way to undo those five brush strokes.
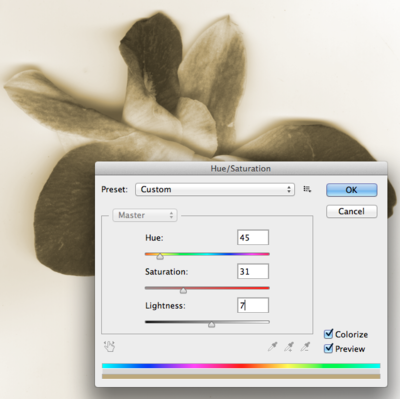
7. Click Image > Adjustments > Hue/Saturation. This adjustment changes the layer’s hue, the intensity or saturation level of the hue and the value of the hues within the image. To create an overall wash of color or monotone effect, click on the “Colorize” button at the bottom right of the dialog box. Changes made to the hue (by dragging the hue slider) will become easily apparent.
The Hue/Saturation adjustment is used to create a monotone wash over the image. Here the image takes on a sepia tone, similar to a traditional photographic bath used to cast a warm tone on the image.
