Difference between revisions of "Chapter 11 CS4"
| (7 intermediate revisions by one other user not shown) | |||
| Line 3: | Line 3: | ||
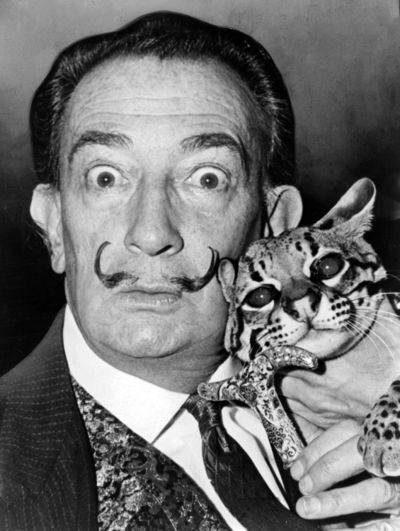
[http://commons.wikimedia.org/wiki/Image:Salvador_Dali_NYWTS.jpg http://commons.wikimedia.org/wiki/Image:Salvador_Dali_NYWTS.jpg] | [http://commons.wikimedia.org/wiki/Image:Salvador_Dali_NYWTS.jpg http://commons.wikimedia.org/wiki/Image:Salvador_Dali_NYWTS.jpg] | ||
| + | |||
| + | [[File:Salvador_Dali_NYWTS.jpg|400px]] | ||
[http://www.missconceptions.net/digital-foundations/ch11-files.zip Click here to download chapter 11 work files.] | [http://www.missconceptions.net/digital-foundations/ch11-files.zip Click here to download chapter 11 work files.] | ||
| + | |||
| + | =Screencasts= | ||
| + | This screencast combines elements of Chapter 6 (the Pen tool) with elements of Chapter 11 (layer masks). It does not correspond specifically with materials in this chapter, but it is related. Students have provided feedback that it is helpful to see these complex tools in action. | ||
| + | {{#ev:youtube|ZUPdjsYnjMc}} | ||
=Chapter 11: Non-Destructive Editing= | =Chapter 11: Non-Destructive Editing= | ||
| Line 39: | Line 45: | ||
=Visual References= | =Visual References= | ||
IMAGE: [http://www.flickr.com/photos/digitalfoundations/2955053067/ http://www.flickr.com/photos/digitalfoundations/2955053067/] | IMAGE: [http://www.flickr.com/photos/digitalfoundations/2955053067/ http://www.flickr.com/photos/digitalfoundations/2955053067/] | ||
| + | |||
| + | [[File:2955053067_a7dcf46d44_b.jpg|400px]] | ||
''Dali Atomicus, Philippe Halsman, 1948.'' This version of the photograph shows an element missing in the final print: the hands holding the chair. Also, the final print contains one of Dali’s paintings (“Leda Atomica”) in the frame on the easel. | ''Dali Atomicus, Philippe Halsman, 1948.'' This version of the photograph shows an element missing in the final print: the hands holding the chair. Also, the final print contains one of Dali’s paintings (“Leda Atomica”) in the frame on the easel. | ||
IMAGE: [http://flickr.com/photos/digitalfoundations/2229002687/ http://flickr.com/photos/digitalfoundations/2229002687/] | IMAGE: [http://flickr.com/photos/digitalfoundations/2229002687/ http://flickr.com/photos/digitalfoundations/2229002687/] | ||
| + | |||
| + | [[File:2229002687_929a712816.jpg|400px]] | ||
''Dada Soiree, Kurt Schwitters, 1922'' | ''Dada Soiree, Kurt Schwitters, 1922'' | ||
| Line 146: | Line 156: | ||
Now we will blend the edges of the mustache using the Paintbrush tool on the layer mask. This will make the mustache appear more realistic on the cat’s face. Click on the Paintbrush tool. Load black into the foreground color. Black will be used on the mask to hide parts of the layer content. Use the Options panel to set the opacity to 70%. Use a big, soft brush. We set our brush at 30 pixels and 0% hardness. Trace just around the edges of the mustache with the edge of the Paintbrush tool brushing against the edge of the mustache. | Now we will blend the edges of the mustache using the Paintbrush tool on the layer mask. This will make the mustache appear more realistic on the cat’s face. Click on the Paintbrush tool. Load black into the foreground color. Black will be used on the mask to hide parts of the layer content. Use the Options panel to set the opacity to 70%. Use a big, soft brush. We set our brush at 30 pixels and 0% hardness. Trace just around the edges of the mustache with the edge of the Paintbrush tool brushing against the edge of the mustache. | ||
| − | [[File:Fig11_Ex2_04.jpg]] | + | [[File:Fig11_Ex2_04.jpg|400px]] |
7. Zoom out to Fit on Screen viewing mode by using Cmd+0 and then view the image with and without the layer mask. Shft+click on the mask icon to disable it. Then Shft+click again on the mask icon to enable it. | 7. Zoom out to Fit on Screen viewing mode by using Cmd+0 and then view the image with and without the layer mask. Shft+click on the mask icon to disable it. Then Shft+click again on the mask icon to enable it. | ||
| Line 154: | Line 164: | ||
and/or | and/or | ||
| − | [[File:Fig11_Ex2_06.jpg]] | + | [[File:Fig11_Ex2_06.jpg|400px]] |
8. View the mask in the document window by Opt+clicking on the mask icon. It is possible to edit the mask with black or white paint in this mode, too, although without seeing the affects of editing the mask on both layers you may be less likely to do so. Click on the icon of the layer content to return to standard editing mode. | 8. View the mask in the document window by Opt+clicking on the mask icon. It is possible to edit the mask with black or white paint in this mode, too, although without seeing the affects of editing the mask on both layers you may be less likely to do so. Click on the icon of the layer content to return to standard editing mode. | ||
| Line 162: | Line 172: | ||
9. Now for the true test: repeat all of the steps in both exercises with the other half of the mustache! | 9. Now for the true test: repeat all of the steps in both exercises with the other half of the mustache! | ||
| − | [[File:Fig11_Ex2_08.jpg]] | + | [[File:Fig11_Ex2_08.jpg|400px]] |
10. Once again, repeat these steps for the eyes. Use the Ellipse Selection tool to select one of Dali’s eyes. Then hold Shft while selecting the other eye with the same tool. Make the original file layer active by clicking on it. Press Cmd+J to float the selected eyes to a new layer. Rename the layer eyes. | 10. Once again, repeat these steps for the eyes. Use the Ellipse Selection tool to select one of Dali’s eyes. Then hold Shft while selecting the other eye with the same tool. Make the original file layer active by clicking on it. Press Cmd+J to float the selected eyes to a new layer. Rename the layer eyes. | ||
| Line 176: | Line 186: | ||
</table> | </table> | ||
| − | [[File:Fig11_Ex2_09.jpg]] | + | [[File:Fig11_Ex2_09.jpg|400px]] |
11. Use the Move tool to position the eyes onto the cat’s face. You will have to select each eye individually to move it into place and use Edit > Free Transform to rotate it. Add a layer mask and use black paint to hide the edges of the eyes. | 11. Use the Move tool to position the eyes onto the cat’s face. You will have to select each eye individually to move it into place and use Edit > Free Transform to rotate it. Add a layer mask and use black paint to hide the edges of the eyes. | ||
| − | [[File:Fig11_Ex2_10.jpg]] | + | [[File:Fig11_Ex2_10.jpg|400px]] |
| − | |||
=Exercise 3: Adding an adjustment layer and organizing layers with groups= | =Exercise 3: Adding an adjustment layer and organizing layers with groups= | ||
| Line 195: | Line 204: | ||
3. Now we will organize all of our manipulations into one folder. Click once on the left mustache layer then Shft+click on the layer Levels 1 to select all layers above original file. Use the Layers panel pulldown menu to choose New Group from Layers… and name the group manipulations. Now the nondestructive layers are grouped into one folder. The folder can be collapsed or expanded using the small sideways triangle on the left side of the folder icon in the Layers panel. | 3. Now we will organize all of our manipulations into one folder. Click once on the left mustache layer then Shft+click on the layer Levels 1 to select all layers above original file. Use the Layers panel pulldown menu to choose New Group from Layers… and name the group manipulations. Now the nondestructive layers are grouped into one folder. The folder can be collapsed or expanded using the small sideways triangle on the left side of the folder icon in the Layers panel. | ||
| − | [[File:Fig11_Ex3_03.jpg]] | + | [[File:Fig11_Ex3_03.jpg|400px]] |
| − | |||
=Exercise 4: Adding a shape layer= | =Exercise 4: Adding a shape layer= | ||
| Line 206: | Line 214: | ||
2. Look in the Options panel to verify that you are using the Rounded Rectangle tool to make a shape layer, instead of a path (which creates a path like the Pen tool) or a pixel layer (which creates a selection). | 2. Look in the Options panel to verify that you are using the Rounded Rectangle tool to make a shape layer, instead of a path (which creates a path like the Pen tool) or a pixel layer (which creates a selection). | ||
| − | [[File:Fig11_Ex4_02.jpg]] | + | [[File:Fig11_Ex4_02.jpg|400px]] |
3. Draw a rounded rectangle in the image near Dali’s fingers. Notice that you will have a new layer named Shape Layer 1 in the Layers panel. Shape layers can be moved with the Move tool and they appear in the Layers panel as an overall path of color with a vector mask defining where the color is applied and where it is hidden, based on the way the shape was drawn. | 3. Draw a rounded rectangle in the image near Dali’s fingers. Notice that you will have a new layer named Shape Layer 1 in the Layers panel. Shape layers can be moved with the Move tool and they appear in the Layers panel as an overall path of color with a vector mask defining where the color is applied and where it is hidden, based on the way the shape was drawn. | ||
| Line 214: | Line 222: | ||
optional image: | optional image: | ||
| − | [[File:Fig11_Ex4_04.jpg]] | + | [[File:Fig11_Ex4_04.jpg|400px]] |
4. It’s easy to change the color of a Shape layer as long as the document is in a mode that supports color! Try to load a red hue into the foreground color chip. It’s gray! Use Image > Mode > RGB color to convert this grayscale image to RGB color mode. At the Merge layers before mode change? warning, choose “Don’t Merge.” | 4. It’s easy to change the color of a Shape layer as long as the document is in a mode that supports color! Try to load a red hue into the foreground color chip. It’s gray! Use Image > Mode > RGB color to convert this grayscale image to RGB color mode. At the Merge layers before mode change? warning, choose “Don’t Merge.” | ||
| Line 222: | Line 230: | ||
6. Use the Type tool to type Dali and his cat on top of the rectangular box. We used News Gothic Italic in 62 points with 40 point letter spacing. You can fill your type with black however you like, but try the key command on this layer, too. We had black loaded in the background color chip. Cmd+Delete will fill with the background color. | 6. Use the Type tool to type Dali and his cat on top of the rectangular box. We used News Gothic Italic in 62 points with 40 point letter spacing. You can fill your type with black however you like, but try the key command on this layer, too. We had black loaded in the background color chip. Cmd+Delete will fill with the background color. | ||
| − | [[File:Fig11_Ex4_05.jpg]] | + | [[File:Fig11_Ex4_05.jpg|400px]] |
Latest revision as of 23:40, 27 January 2013
Download Materials for Chapter 11
You will need this file to work with in all four exercises:
http://commons.wikimedia.org/wiki/Image:Salvador_Dali_NYWTS.jpg
Click here to download chapter 11 work files.
Screencasts
This screencast combines elements of Chapter 6 (the Pen tool) with elements of Chapter 11 (layer masks). It does not correspond specifically with materials in this chapter, but it is related. Students have provided feedback that it is helpful to see these complex tools in action.
Chapter 11: Non-Destructive Editing
In Chapter 9 we referred to Hippolyte Bayard’s Self Portrait as a Drowned Man from 1840 as the first combination print. The history of photographic manipulation extends almost as far back as the first photographic images. Digital tools such as Photoshop are used for small and large image manipulations, such as the slightest adjustment to the tonal range or the creation of an alternative reality.
| Note: See this link for a group exhibit in 2000 at the Laurence Miller Gallery titled Alternative Realities. [1] |
In certain situations, the digital artist must be ethically aware of the manipulation that occurs in such applications. The National Press Photographers Association maintains a code of ethics that journalism students and professionals should abide. Journalists and news photographers strive for accuracy in their image-based reporting. There are historical cases of digital manipulation which are often used to illustrate a violation of the NPPA code of ethics (see the National Geographic 1982 cover image of the pyramids).
| Note: NPAA code of ethics can be found here: [2] |
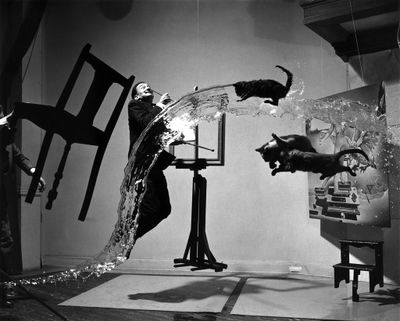
For the purpose of art-making, editorial or opinionated commentary, manipulation can be used to challenge the viewer’s expectations. An image can be reinterpreted as it relates to other images within a composition through the modification of scale or proximity. The visual reference to Philippe Halsmann’s Dali Atomicus demonstrates a manipulation of reality, or the laws of physics, made with a 4 by 5 camera in his studio. This image was captured after “six hours and twenty-eight throws,” wrote Halsman in Halsman on the Creation of Photographic Ideas (1963).
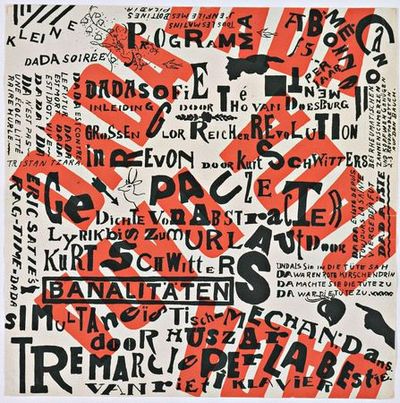
The visual reference to Dada artist Kurt Schwitters’ Dada Soiree demonstrates that typography can also be manipulated in the construction of a collage. While neither of these visual works were created in a digital environment (both were made before the advent of digital tools), alternate realities and manipulations are often created with computer software. Within the exercises of this chapter, we will focus not only on manipulating an image, but also on working in a nondestructive method. To edit the digital file nondestructively is to work in such a way that the original image is preserved. Any edits or modifications to the original file are placed on separate layers or in alpha channels, which we will explore further in exercise 2.
Visual References
IMAGE: http://www.flickr.com/photos/digitalfoundations/2955053067/
Dali Atomicus, Philippe Halsman, 1948. This version of the photograph shows an element missing in the final print: the hands holding the chair. Also, the final print contains one of Dali’s paintings (“Leda Atomica”) in the frame on the easel.
IMAGE: http://flickr.com/photos/digitalfoundations/2229002687/
Dada Soiree, Kurt Schwitters, 1922
Image of final exercise files
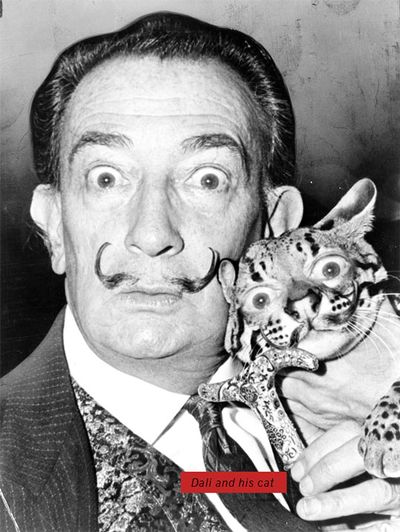
Each exercise in Chapter 11 builds on itself to make the final image at the end of exercise four.
Exercise 1: Using Quick Masks and Alpha Channels
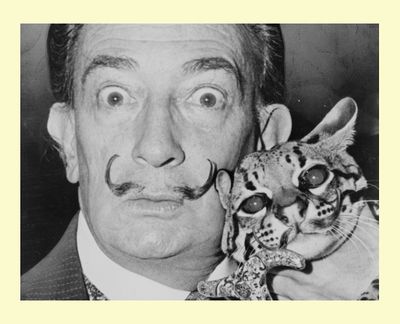
1. In Photoshop, use File > Open to open the file of Salvador Dali holding a cat from the wiki.
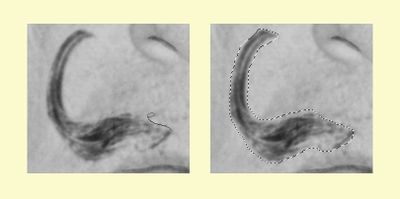
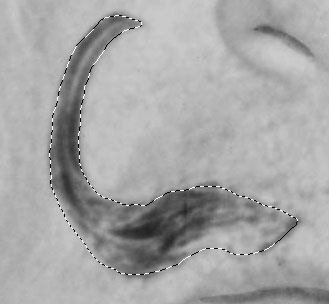
2. Use the Lasso tool from the Toolbox to make a selection around the left part of Dali’s mustache. The Lasso tool can be used to make freehand selections. Click and drag with the Lasso tool from the beginning of of the mustache all the way around its contour. The selection is made when you bring the mouse back to the point where you first pressed the mouse button. Your selection will not be a perfect tracing of the mustache. We will modify the selection in the next step. The Lasso tool serves the purpose of making a fast draft of a selection which can be used as a starting point for masks.
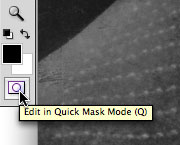
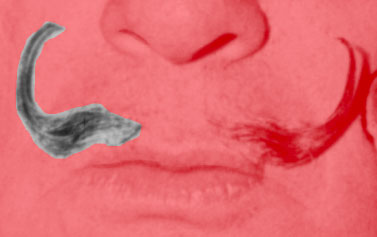
3. Enter Quick Mask Mode by pressing the “Q” key on the keypad or clicking on the Quick Mask icon at the bottom of the Toolbox, just beneath the foreground/background color chip icons. Quick Mask will turn all of the image areas that are not selected bright red. The selected areas are easily visible. Quick Mask is basically another way to modify a selection, but it behaves like all masks in the Adobe Creative Suite programs. Learning to use Quick Mask will help you to understand masking. Masks define which areas are visible and which image areas are invisible. Masks do not delete image areas (this is why we have classified this as “non-destructive”), they simply are used to hide or show parts of images. Since masks are either hiding or showing image areas (or partially showing), they operate in black and white and create transparency with shades of gray.
4. Click on the Paintbrush tool and make sure that the default colors are loaded into the foreground/background color chips (black on top, white as the background color) by clicking on the small black/white color chip icon to the top left area of the actual color chips in the Toolbox.
| Tip: The letter “D” on the keypad will load black into the foreground color and white into the background color chip. These are the default color positions. |
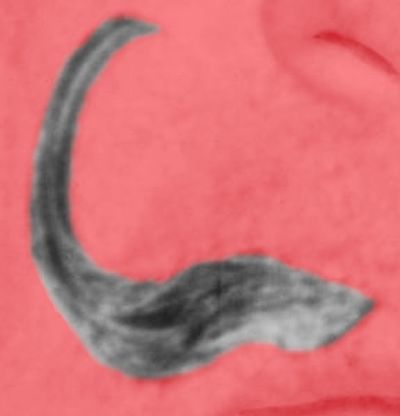
On any mask, the color black will hide part of the image and the color white will reveal part of the image. The red overlay in Quickmask is used as a guide, so you can easily see where you have painted with black or white to add or remove the mask. Painting with white paint on the Quick Mask will take away red parts (masked parts). This will add parts of the image to the selection area. Painting with black paint on the Quick Mask will add red parts. In other words, it will add to the mask and subtract from the selection area. Practice painting with black and white paint. Paint with different size brushes and notice what happens with a soft or hard brush, or with the brush set at different opacities. As you are painting, press the letter “Q” to exit Quick Mask Mode. You will see the resulting selection. Press “Q” again to re-enter Quick Mask Mode and continue painting to modify the mask.
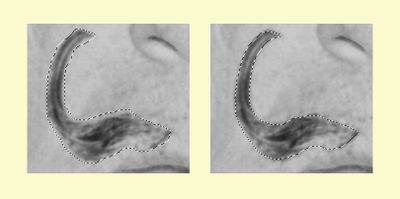
The final brushwork in Quickmask and the resulting selection in standard editing mode.
5. Exit Quick Mask and return to standard editing mode when you are finished modifying the selection in Quick Mask mode. Your selection should more closely fit the contour of the mustache.
Here is an image of our Lasso tool selection before Quick Mask and the final selection after making modifications with the Paintbrush in Quick Mask.
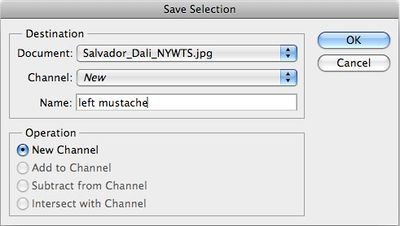
6. Choose Select > Save Selection and name the new selection left mustache. Click OK.
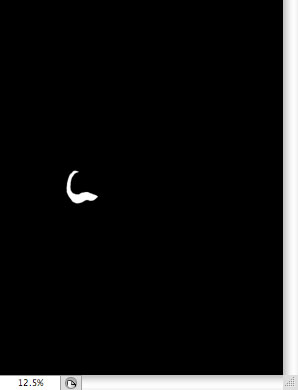
7. When a selection is saved it becomes an alpha channel. An alpha channel is a grayscale channel that defines which parts of an image are visible. All channels can be viewed by clicking on their names in the Channels panel. Click on the Channels tab in the Layers panel, then click on the name, left mustache. The file now shows the left mustache alpha channel. Everything that is not included in the mask is black, and the once selected shape of the left side of the mustache is white.
8. Click back on the Gray channel to return to standard editing mode. Deselect the left side of the mustache by choosing Select Menu > Deselect or use the key command, Cmd+D. Then reselect the left side of the mustache by loading it from the Channel panel by Cmd+clicking on the icon of the alpha channel, left mustache. Practice deselecting and then loading the alpha channel, or reselecting by using Cmd+D then Cmd+click on the alpha channel.
9. Use File > Save as to save the Photoshop file. We named ours daliwithcat.psd.
Exercise 2: Saving a selection on a layer mask
1. Start with the selection of the left side of the mustache loaded.
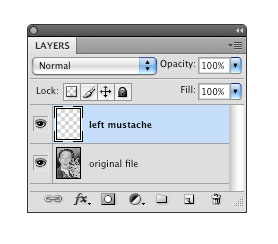
2. Copy and paste the half-mustache to a new layer by either using the Edit Menu or Cmd+J.
3. Rename your layers. We named the Background layer original file and the copied layer left mustache.
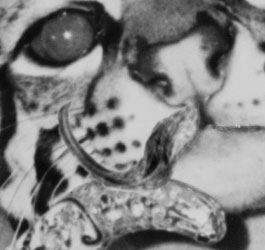
4. Use the Move tool to position the mustache on the left side of the cat’s face. Then use Edit > Free Transform to rotate the mustache to the left.
| Watch Out: If the left mustache layer was not active (highlighted) you may have moved the layer containing the original file. Make sure the layer that you want to edit is active before editing. |
We will add a final adjustment for contrast at the end of this exercise, but you can add an adjustment with Levels now to make the mustache darker.
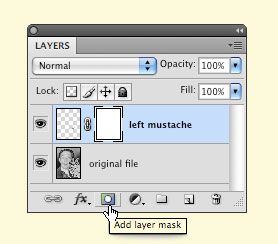
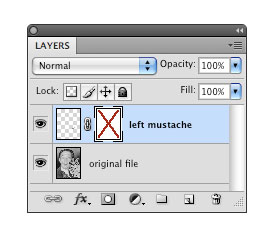
5. Now we will add a mask to the left mustache layer in order to further control how the layer blends with the original image. Add a layer mask by clicking on the Add Layer Mask button in the bottom of the Layers panel.
6. Zoom in to at least 100% before editing the mask. Notice that the icon for the mask is white in the Layers panel. Since everything on the layer is revealed, the entire mask is white.
The mask is currently active in the Layers panel. You can tell which part of the layer is active – the content or the mask, because there is a frame around the icon for the active layer component.
| Tip: Click on the icon of the layer content or the layer mask to activate either layer component. |
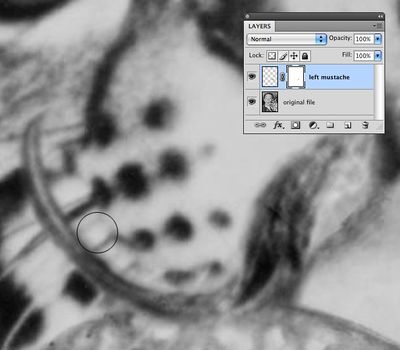
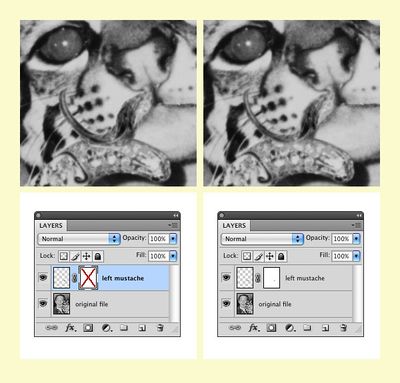
Now we will blend the edges of the mustache using the Paintbrush tool on the layer mask. This will make the mustache appear more realistic on the cat’s face. Click on the Paintbrush tool. Load black into the foreground color. Black will be used on the mask to hide parts of the layer content. Use the Options panel to set the opacity to 70%. Use a big, soft brush. We set our brush at 30 pixels and 0% hardness. Trace just around the edges of the mustache with the edge of the Paintbrush tool brushing against the edge of the mustache.
7. Zoom out to Fit on Screen viewing mode by using Cmd+0 and then view the image with and without the layer mask. Shft+click on the mask icon to disable it. Then Shft+click again on the mask icon to enable it.
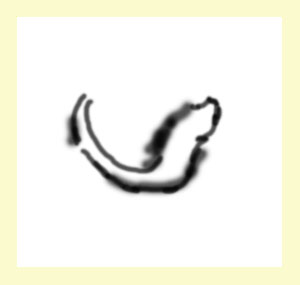
8. View the mask in the document window by Opt+clicking on the mask icon. It is possible to edit the mask with black or white paint in this mode, too, although without seeing the affects of editing the mask on both layers you may be less likely to do so. Click on the icon of the layer content to return to standard editing mode.
9. Now for the true test: repeat all of the steps in both exercises with the other half of the mustache!
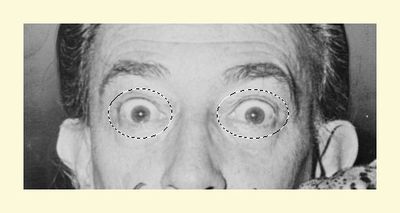
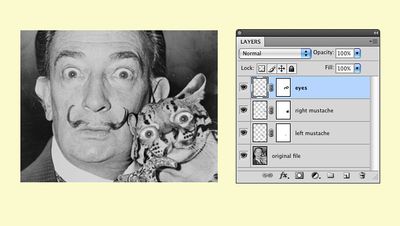
10. Once again, repeat these steps for the eyes. Use the Ellipse Selection tool to select one of Dali’s eyes. Then hold Shft while selecting the other eye with the same tool. Make the original file layer active by clicking on it. Press Cmd+J to float the selected eyes to a new layer. Rename the layer eyes.
| Tip: If you see this warning you probably did not make the correct layer active before pasting or floating: “Could not make a new layer from the selection because the selected area is empty.” |
11. Use the Move tool to position the eyes onto the cat’s face. You will have to select each eye individually to move it into place and use Edit > Free Transform to rotate it. Add a layer mask and use black paint to hide the edges of the eyes.
Exercise 3: Adding an adjustment layer and organizing layers with groups
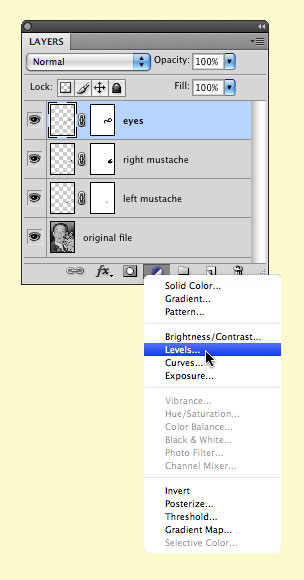
1. Add a Levels adjustment layer on top of the eyes layer. We used the button in the bottom of the Layers panel.
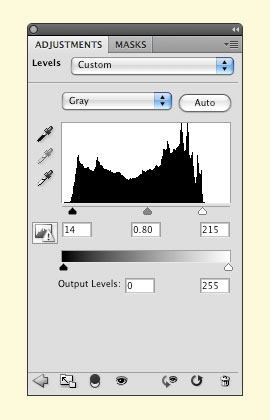
2. Push the sliders beneath the shadow and highlight areas towards each other in the Adjustments panel to create more contrast in the image.
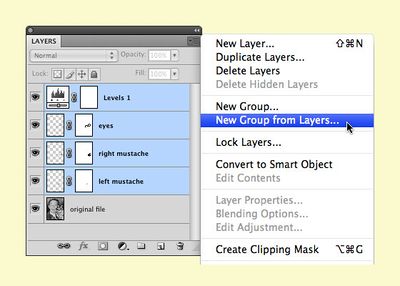
3. Now we will organize all of our manipulations into one folder. Click once on the left mustache layer then Shft+click on the layer Levels 1 to select all layers above original file. Use the Layers panel pulldown menu to choose New Group from Layers… and name the group manipulations. Now the nondestructive layers are grouped into one folder. The folder can be collapsed or expanded using the small sideways triangle on the left side of the folder icon in the Layers panel.
Exercise 4: Adding a shape layer
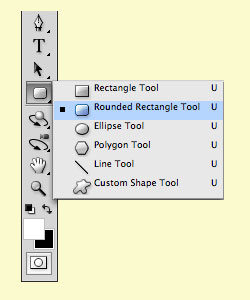
1. Choose the Rounded Rectangle tool from the Toolbox. This tool hides behind the Rectangle tool. All of the tools grouped beneath the Rectangle tool are called Shape tools. In Photoshop, Shape tools and typography created with the Type tool can be added to the document as vector layers.
2. Look in the Options panel to verify that you are using the Rounded Rectangle tool to make a shape layer, instead of a path (which creates a path like the Pen tool) or a pixel layer (which creates a selection).
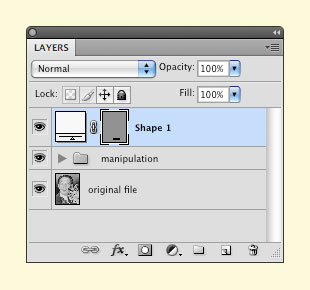
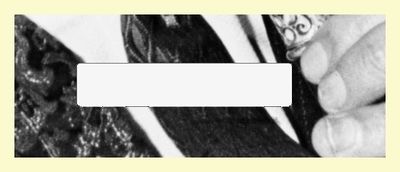
3. Draw a rounded rectangle in the image near Dali’s fingers. Notice that you will have a new layer named Shape Layer 1 in the Layers panel. Shape layers can be moved with the Move tool and they appear in the Layers panel as an overall path of color with a vector mask defining where the color is applied and where it is hidden, based on the way the shape was drawn.
optional image:
4. It’s easy to change the color of a Shape layer as long as the document is in a mode that supports color! Try to load a red hue into the foreground color chip. It’s gray! Use Image > Mode > RGB color to convert this grayscale image to RGB color mode. At the Merge layers before mode change? warning, choose “Don’t Merge.”
5. Now put a red hue into the foreground color chip using the Color Picker or the Color panel. As long as the vector layer is active, use the key command Opt+Delete to fill the Shape 1 layer with the color you loaded into the foreground color chip.
6. Use the Type tool to type Dali and his cat on top of the rectangular box. We used News Gothic Italic in 62 points with 40 point letter spacing. You can fill your type with black however you like, but try the key command on this layer, too. We had black loaded in the background color chip. Cmd+Delete will fill with the background color.
