|
|
| (7 intermediate revisions by the same user not shown) |
| Line 1: |
Line 1: |
| − | =Download Materials for Chapter 20= | + | =Chapter 20: Video= |
| | | | |
| − | The first exercise in this chapter utilizes the final FLA file created in Chapter 19. If you do not have the final FLA file from the Chapter 19 exercises, you can download and use ours:
| + | =Exercise 1 : Draw Solar and Lunar Solid= |
| | | | |
| − | [http://www.missconceptions.net/digital-foundations/ch20-files.zip Click here to download chapter 20 work files.]
| + | '''1.''' Open Adobe After Effects. Select “New Project…” in the startup menu. |
| | | | |
| − | =Chapter 20: ActionScript3.0=
| + | [[File:Fig20 Ex1 01 CC2018.png|500px]] |
| | | | |
| − | Interactivity is a much ballyhooed concept of the late 20th and early 21st century. We walk around listening to iPods while texting on our cell phones, drive according to directions from a satellite spoken to us live in a calm computerized voice, and are constantly reviewing our blogs, Flickr pages, Google Alerts, and email.
| |
| | | | |
| − | Interactivity is not new. The archaeologist Alexander Marschak has argued that the caves at Lascaux was an interactive site; it was a place where people visited to leave reactive marks. From chess to basketball, mahjong to tennis, games are ancient interactive forms of entertainment, intellectual diversion, and fun.
| + | '''2.''' Select “New Composition.” Name the Composition “Eclipse” Make sure the width is set to 1920 px and the height is set to 1080 px. Set the frame rate by selecting 29.97 from the pull-down menu. Set the Duration to 20 seconds which is 0;00;20;00. Press OK. |
| | | | |
| − | Though interactivity is not new, its is increasingly pervasive as a mode of relating to information, people, and entertainment. Building up from the most basic set of logical arguments, early computer programmers created games. Spacewar, Pong, and Space Invaders all share more or less the same basic set of interactivity: Move left; move right; shoot a missle; did it hit?; if it hit, then the alien explodes; if it didn't hit, nothing happens.
| + | [[File:Fig20 Ex1 02 CC2018.png|500px]] |
| | | | |
| − | This basic interactive vocabulary is used in Flash’s programming language, ActionScript3.0. Some of the most basic things we can program are registering the user's clicks to start or stop the Timeline. This is the focus of in the following exercises.
| |
| | | | |
| − | [http://commons.wikimedia.org/wiki/Image:Spacewar!-PDP-1-20070512.jpg http://commons.wikimedia.org/wiki/Image:Spacewar!-PDP-1-20070512.jpg]
| + | '''3.''' In the center of the comp create a circle by using the ellipse tool and name this layer “Sun.” |
| | | | |
| − | [[File:800px-Spacewar!-PDP-1-20070512.jpg|400px]] | + | [[File:Fig20 Ex1 03 CC2018.png|800px]] |
| | | | |
| − | Spacewar, 1961, Martin Graetz, Stephen Russell, and Wayne Wiitanen, computer program for DEC PDP-1 computer.
| |
| | | | |
| − | In 1961, at the height of the Cold War US/Soviet space race, three MIT graduate students (Martin Graetz, Stephen Russell, and Wayne Wiitanen) programmed Spacewar, the first video game. In the game two spaceships shoot at each other. The creators added moving stars and changing brightness, a technological feat at the time. If we break the game down into its core interactions, you and your opponent can turn your spaceship right or left, go forward, and shoot. Lastly, the program registers whether your ship has been hit by your opponent’s missile. This is pretty simple, but it forms the basis for much game based interactivity. Put simply: Move your avatar around and shoot things.
| + | '''4.''' Change the shape so that the Fill Color is yellow and no Stroke Color. |
| | | | |
| − | IMAGE FROM TRIGGER HAPPY
| + | [[File:Fig20 Ex1 04 CC2018.png|800px]] |
| | | | |
| − | [[File:Firefox008.png|400px]]
| |
| | | | |
| − | Trigger Happy, 1998, Jon Thomson and Alison Craighead, computer program written in Macromedia Director, the predecessor to Flash. ([http://www.thomson-craighead.net/docs/thap.html http://www.thomson-craighead.net/docs/thap.html])
| + | '''5.''' Duplicate the “Sun” layer and rename the duplicate “Moon.” |
| | | | |
| − | In 1998 the artist duo Jon Thomson and Alison Craighead created a Space Invaders inspired game and gallery installation called “Trigger Happy”. While the player is playing a game that is very similar to Space Invaders, the content is quite different. The player reads and shoots at snippets of text that create a theoretical argument for the death of individual authoring. The trigger-happy viewer becomes a collaborator in the authoring of the text in the installation. From the players point of view, playing Trigger Happy is like playing Space Invaders where the controller moves the avatar left and right and shoots.
| + | [[File:Fig20 Ex1 05 CC2018.png|800px]] |
| | | | |
| − | =Exercise 1: Buttons=
| |
| − | In this exercise, we are going to write ActionScript that starts and stops the animation we created in the last exercise of Chapter 19. Before we can start and stop the Timeline with code, we need to create a user interface, in this case buttons, that the viewer will use to control the Flash Timeline.
| |
| | | | |
| − | 1. Open the final FLA file that you created in Chapter 19, or download and open our file from Chapter 19 on the wiki.
| + | '''6.''' Change the Fill color of the “Moon” to black. |
| | | | |
| − | 2. Insert a new symbol and choose Button from the Type pull-down panel menu. Name it startStopBtn.
| + | [[File:Fig20 Ex1 06 CC2018.png|800px]] |
| | | | |
| − | <table class="infobox">
| + | =Exercise 2 : Add Glow Effect and and Keyframes= |
| − | <tr>
| |
| − | <td>Note: The best practice for naming objects, buttons, and movie clips in Flash is to start with a lowercase letter, and capitalize all new words. Button names should end with "btn". Movie Clip names should end with "mc." Ending with these suffixes allows the Flash ActionScript editor to auto-complete your code and makes it easier for others to understand your intentions.</td></tr></table>
| |
| − | 3. Notice that the Button Symbol Timeline looks different than the symbol editor we encountered in Chapter 19. The Flash Timeline is adjusted for buttons. It has four frames corresponding to the four button states: Up, Over, Down, and Hit.
| |
| | | | |
| − | <br><br>
| + | '''1.''' Select the “Sun” layer and search for the “Glow” effect in the Effects & Presets Panel. |
| − | [[File:Fig20-01-buttontimeline_CS6.png|750px]]
| |
| − | <br><Br>
| |
| | | | |
| − | "Up" is the normal button state. In the up state frame of the timeline, you should design what the button looks like when the user is not interacting with the button.
| + | [[File:Fig20 Ex2 01 CC2018.png|800px]] |
| | | | |
| − | "Over" is the mouse-over button state. In the over state frame of the timeline, you should design what the button looks like when the user mouses over the button. You can copy and paste the same button design from the up state to the over state if you do not want the button to change when the user mouses over the button.
| |
| | | | |
| − | "Down" is the mouse-down button state. In the down state frame of the timeline, you should design what the button looks like when a user clicks on it.
| + | '''2.''' Double click on the Glow effect to apply it to the “Sun” layer. |
| | | | |
| − | "Hit" is not a button state. “Hit” is the area that you define to be the clickable part of the button. For example, if your button is the letter O, the Hit area should include the middle portion of the letter.
| + | [[File:Fig20 Ex2 02 CC2018.png|800px]] |
| | + | |
| | | | |
| − | <table class="infobox">
| + | '''3.''' Under Glow > Glow Radius in the Effect Controls Panel, change the value to 300. |
| − | <tr>
| |
| − | <td>Note: The hit area of the letter O is one example of how users are different from readers. For a reader, the letter O is defined by a thin, circular line surrounding an oval of negative space. A reader ignores the negative space when reading the letter O, concentrating on the contour of the letter. A user clicks on the negative space. Although the outline defines the letter, the negative space has more mass. The user sees the O as being a filled-in circle, rather than an empty circle. When designing interactive media the artist should consider how the user, not the reader, behaves with media elements.</td></tr></table>
| |
| − | 4. With the Playhead in the Up state, draw a red circle with the Oval tool in the middle of the Symbol Editor Stage.
| |
| − | 5. Open the Align panel from Window > Align. Click the “To Stage” button, then center align your button vertically and horizontally.
| |
| | | | |
| − | [[File:Fig20-02-align01_CS6.png]] | + | [[File:Fig20 Ex2 03 CC2018.png|800px]] |
| − | <br><Br>
| |
| | | | |
| − | [[File:Fig20-02-align02_CS6.png]]
| |
| − | <br><Br>
| |
| | | | |
| − | [[File:Fig20-02-align03_CS6.png]]
| + | '''4.''' Go to the 9 second mark on the timeline and create a keyframe next to Glow Radius. |
| − | <br><Br>
| |
| | | | |
| − | [[File:Fig20-02-align04_CS6.png|750px]] | + | [[File:Fig20 Ex2 04 CC2018.png|800px]] |
| − | <br><Br>
| |
| − | 6. Insert a keyframe (F6) in the Over frame of the button symbol editing timeline. Choose View > Rulers and pull guides around all four sides of the circle.
| |
| | | | |
| − | [[File:Fig20-03-rulers_CS6.png|750px]]
| |
| − | <br><Br>
| |
| − | 7. Modify the Over state button so it looks different from the Up state. We drew a square on top of the circle in the same color. The new shape is an obvious modification that we will expect to see when we test the buttons.
| |
| | | | |
| − | [[File:Fig20-04-square_CS6.png|750px]]
| + | '''5.''' Move the playhead to the 10 second mark and change the Glow Radius to 1000. |
| − | <br><Br>
| |
| − | 8. Insert a keyframe (F6) in the Down frame. Do not modify the shape. Our button will visually respond when the user mouses over it. It will not respond visually to mouse clicking because we are not changing this frame.
| |
| − | 9. Insert another keyframe in the Hit frame. This defines the clickable area of the button. Set the Hit state to the same circle as you have in the Up button state by deleting the square (which was a result of adding a keyframe), then copying the red circle from the Up frame and using Edit > Paste in Place on the Hit frame (Command+Shift+V).
| |
| | | | |
| − | =Exercise 2: Add Buttons to the Timeline=
| + | [[File:Fig20 Ex2 05 CC2018.png|800px]] |
| − | 1. Return to the scene Timeline by clicking on the left arrow or the Scene 1 button near the top left of the Stage.
| |
| − | <br><br>
| |
| − | [[File:Fig20-05-scene_CS6.png]] | |
| − | <br><Br>
| |
| − | 2. Create a new layer named stop above the circles layer in the Timeline. Insert your button on the stage at frame 1 of the stop layer. Position the button on top of the circle on the left side of the Stage.
| |
| − | <br><br>
| |
| − | [[File:Fig20-06-stop01_CS6.png|750px]]
| |
| − | <br><br>
| |
| − | 3. Test the animation (Command+Return). Move your mouse over the button and watch the button as it responds to your mouse interactivity. You should see the circle morph into another shape.
| |
| − | 4. Create a new layer named go in the timeline. Since buttons are symbols, you can add multiple instances of the button to the stage. Add another instance of the button in frame 1 of the go layer on the right side of the Stage. Use the Color Effect tint style in the Properties panel to change the color of the button to green. The tint effect changes the color of all of the button states.
| |
| − | <br><br>
| |
| − | [[File:Fig20-07-go_CS6.png|750px]]
| |
| − | <br><br>
| |
| − | 5. Click on the first instance of the button on the stop layer. Name the first instance of the button stop_btn using the Instance Name field of the Properties panel.
| |
| | | | |
| − | [[File:Fig20-08-stopbtn_CS6.png|750px]]
| |
| − | <br><br>
| |
| | | | |
| − | Name the instance of the button on the go layer start_btn. Now we have buttons on the left and right sides of the Stage. The button on the left is going to stop the animation and the button on the right will start it.
| + | '''6.''' Move the playhead to the 11 second mark and change the Glow Radius back to 300. |
| | | | |
| − | =Exercise 3: Stopping the Timeline=
| + | [[File:Fig20 Ex2 06 CC2018.png|800px]] |
| − | 1. Create a new layer called actions in the Timeline. This is where the code that controls the buttons will be stored. It is best to make a seperate layer for the ActionScript code so that you (and any collaborators) are easily able to find and modify the code.
| |
| − | 2. Select the first frame of the actions layer and open the Actions panel from Window > Actions.
| |
| − | 3. Copy the following code into the Actions window. This code will make the Timeline stop and start when you click on the button instance labeled stop_btn.
| |
| | | | |
| − | // this is the code to add event handlers to buttons
| + | =Exercise 3 : Animate Transit= |
| | | | |
| − | import flash.events.MouseEvent;
| + | '''1.''' Move the playhead to the first frame. Move the “Moon” layer to the bottom right corner of the composition and make a Keyframe for position under Transform > Position. |
| | | | |
| − | stop_btn.addEventListener(MouseEvent.CLICK, pulseStop);
| + | [[File:Fig20 Ex3 01 CC2018.png|800px]] |
| | | | |
| − | function pulseStop(event:MouseEvent):void{
| |
| | | | |
| − | stop();
| + | '''2.''' Move the playhead to the last keyframe and change the position so that the shape is at the top left of the composition. |
| − | }
| |
| | | | |
| − | <table class="infobox"><tr><td>Note: Notice the words “event handlers” in the first line of the code. In programming, event handlers are common subroutines which essentially handle inputs. An input is considered something like a key press or mouse movement.</td></tr></table>
| + | [[File:Fig20 Ex3 02 CC2018.png|800px]] |
| − | <br>
| |
| − | [[File:Fig20-09-actions_CS6.png|750px]] | |
| − | <br><br>
| |
| | | | |
| − | =Exercise 4: Analyze the Code=
| |
| − | There are two ways of working with code when you are not the original author. This is a common situation, and you will find both ways of working to be useful at different times. You can either try to understand every word that is written in a given piece of code; or you can treat the code like a black box, ignoring everything besides the input and output. In the black box metaphor, all you need to know is that if you modify a certain part of the code, the results will change. In this exercise, we work with the code from Exercise 3 in both ways.
| |
| − | Before we chart how the code works, notice some of the formatting principles at work. Some of this is functional, and some of it is for legibility, but you should follow all of these formatting rules.
| |
| | | | |
| − | 1. CAPITALIZATION MATTERS!
| + | '''3.''' Press SPACE to preview. This will make the “Moon” layer transit across the composition and create an eclipse. |
| | | | |
| − | flash.events.mouseevent is not the same as flash.events.MouseEvent.
| + | =Exercise 4 : Add First Lens Flare and Keyframes= |
| | | | |
| − | Capitalization is not just a style preference in ActionScript3.0, it actually affects functionality. Only the properly capitalized code
| + | '''1.''' Create an adjustment layer by clicking on Layer > New > Adjustment Layer. Rename this layer “First Flare” and make sure it is the top layer in the Layers Panel. |
| − | (flash.events.MouseEvent) will work. The other text will produce an error.
| |
| | | | |
| − | 2. Every line ends with a semicolon (;) unless it is inside curly braces {}
| + | [[File:Fig20 Ex4 01 CC2018.png|500px]] |
| − | <br>
| |
| − | 3. Commands contained in curly braces are set on a new line and indented.
| |
| − | <br>
| |
| − | 4. Every time an opening parenthesis or curly brace is used, a closing parenthesis or curly brace must close the statement, otherwise the code will not be read by the program properly and you will receive errors.
| |
| − | <br>
| |
| − | 5. The two slashes in the first line (//) are used to make a comment. Comments allow you to leave yourself or others notes in the code. This is especially helpful if part of the code is complex or not working. Anything which is put after a // will be ignored by the program when it runs the code.
| |
| − | <br>
| |
| | | | |
| − | There are four parts to this code:
| |
| − | // this is the code to add event handlers to buttons
| |
| | | | |
| − | First, a programming standard is to create a comment for yourself or anyone who reads your code. The two slashes tell ActionScript that what follows is a comment. This part of the code is important because it describes what the code does, but it does not affect the functionality of the buttons.
| + | '''2.''' In the Effects & Presets Panel, search for “Lens Flare” and double click it to apply it to your adjustment layer. |
| − | <br>
| |
| − | import flash.events.MouseEvent;
| |
| − | <br>
| |
| − | This line imports code that the Adobe developers wrote to control mouse events. The mouse moving onto the button is a mouse event, as is a click on a button, or the mouse moving off the button.
| |
| − | <br>
| |
| − | stop_btn.addEventListener(MouseEvent.CLICK, pulseStop);
| |
| − | <br><br>
| |
| − | This code adds an event listener to listen for click events. This event listener is defined in the code we imported in the line above.
| |
| − | An event listener waits for an event to happen before allowing the code to respond. An event listener is a method; in programming, a method is like a verb. Methods are activities.
| |
| − | In this example, the event listener is waiting, or listening, for a mouse click (as specified in MouseEvent.CLICK) When the event listener hears an event, it executes the function we created called pulseStop(). A function is code that defines an action and can be reused. A function can be predefined by a computer language, like stop(), or it can be created by the programmer, like pulseStop(). | |
| − | <br>
| |
| − | function pulseStop(event:MouseEvent):void{
| |
| − | stop();
| |
| − | }
| |
| − | <br>
| |
| − | <table class="infobox"><tr><td>Every function has a set of parentheses after it; sometimes they are empty and sometimes they contain additional code. In this basic introduction, it is not necessary to worry about the extra code inside the parentheses.</td></tr></table>
| |
| − | <br><br>
| |
| − | The pulseStop function is defined in these three lines (the final curly bracket constitutes a line). The first line declares the function and the last line ends the function. The code between the curly braces is the part that actually does something. This function stops the timeline.
| |
| − | <br><br>
| |
| − | 4.Test the movie (Command+Return) and click on the stop button. If the stop button stops the timeline, bravo! Otherwise, it’s time to debug.
| |
| − | <br><br>
| |
| − | 5.To debug, first look at the ActionScript Debug Console (Debug > In Flash Professional). This panel will help you figure out what the bug is and where it is located in your code. The Debug Console provides the scene, layer, and frame of the bug. Sometimes it will even be able to diagnose the bug itself.
| |
| − | <Br><br>
| |
| − | <table class="infobox"><tr><td>Tip: When you receive a bug which is vauge or unclear, it is often helpful to try searching for the bug in Google using quotes around the error message. Example: “Frame 10. unexpected error: 102”</td></tr></table>
| |
| − | <br><br>
| |
| | | | |
| − | 6.At first, most of your bugs are going to be typos such as missing semicolons or misused lower or upper case. For instance, if you typed pay(); instead of play(); the debugger would reveal that the bug was on Scene 1, Layer “actions”, and Frame 1. It would provide a message such as “1180: Call to a possibly undefined method pay,” which means it doesn’t know of a method named “pay.” Of course “pay” is a typographic mistake for the word “play.” Fix the typo, and the code will validate and play as expected.
| + | [[File:Fig20 Ex4 02 CC2018.png|800px]] |
| | | | |
| − | =Exercise 5: Starting the Timeline=
| |
| − | 1. Now add another event listener for the start button.
| |
| | | | |
| − | start_btn.addEventListener(MouseEvent.CLICK,pulseStart);
| + | '''3.''' Under Effects > Lens Flare > Flare Center, change the the Flare Center position so that it is slightly above and to the left of the center of the “Sun” layer. (See screenshot for reference) |
| | | | |
| − | function pulseStart(event:MouseEvent):void{
| + | [[File:Fig20 Ex4 03 CC2018.png|800px]] |
| | | | |
| − | play();
| |
| − | }
| |
| − |
| |
| − | 2. Notice the following modifications in this new code:
| |
| − | a. The name of the button referred to as “stop_btn” has been changed to “start_btn.”
| |
| − | b. The name of the function was “pulseStop”. Now we are calling it “pulseStart” in both the location where it is called, on the first line, and the location where it is defined, on the second line.
| |
| − | c. The contents of the function change from stop(); to play();.
| |
| | | | |
| − | 3.Test your movie to see if you can start and stop the animation.
| + | '''4.''' Move the playhead so it is at the 2 second mark and create a Keyframe for the Flare Center. |
| | | | |
| − | 4.If the buttons aren’t working, it’s time to debug again! | + | [[File:Fig20 Ex4 04 CC2018.png|800px]] |
| | + | |
| | + | |
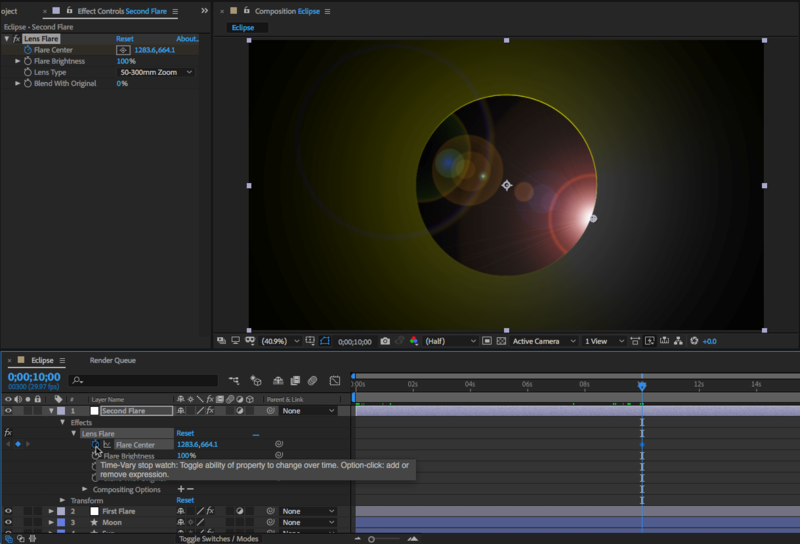
| | + | '''5.''' Move the playhead to the 9 second mark and change the Flare Center Position so that it is towards the upper left edge of the “Sun” shape. |
| | + | |
| | + | [[File:Fig20 Ex4 05 CC2018.png|800px]] |
| | + | |
| | + | |
| | + | '''6.''' Move the playhead to the first frame and change the value of Flare Brightness to 0%. |
| | + | |
| | + | [[File:Fig20 Ex4 06 CC2018.png|800px]] |
| | + | |
| | + | |
| | + | '''7.''' At the 2 second mark, make a keyframe for Flare Brightness. |
| | + | |
| | + | [[File:Fig20 Ex4 07 CC2018.png|800px]] |
| | + | |
| | + | |
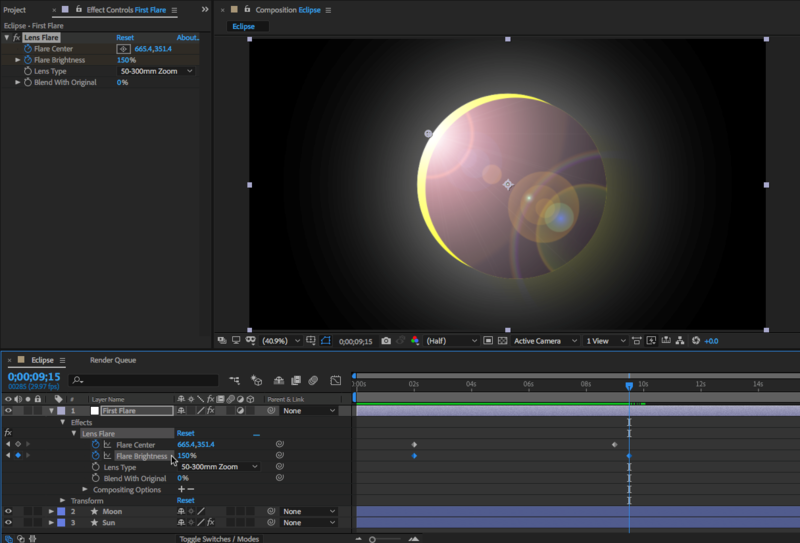
| | + | '''8.''' Then move the playhead to the 9:15 second mark and bring the value for the Flare Brightness up to 150%. |
| | + | |
| | + | [[File:Fig20 Ex4 08 CC2018.png|800px]] |
| | + | |
| | + | |
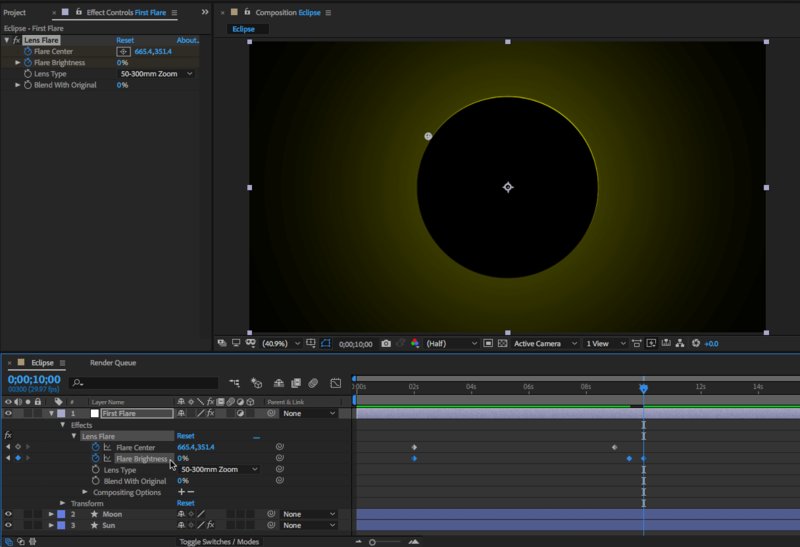
| | + | '''9.''' Move the playhead to the 10 second mark and make another Keyframe with the Flare Brightness at 0%. |
| | + | |
| | + | [[File:Fig20 Ex4 09 CC2018.png|800px]] |
| | + | |
| | + | |
| | + | '''10.''' Press SPACE to preview the composition. The moon should be transiting across the sun with the lens flare growing in brightness then quickly disappearing once the moon is directly over the sun. |
| | + | |
| | + | =Exercise 5 : Add Second Lens Flare and Keyframes= |
| | + | |
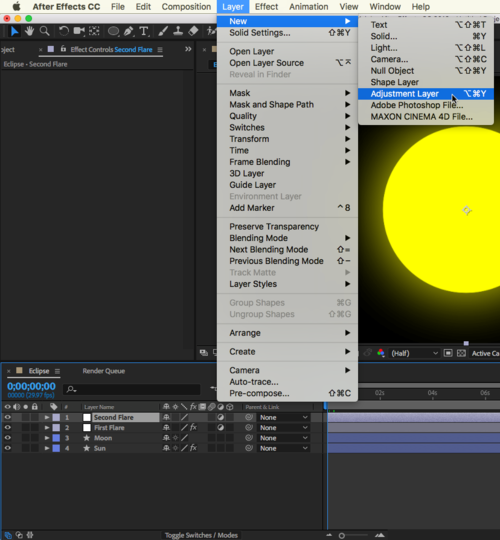
| | + | '''1.''' Create another adjustment layer by clicking on Layer > New > Adjustment Layer. Rename this layer “Second Flare” and make sure it is the top layer in the Layers Panel. |
| | + | |
| | + | [[File:Fig20 Ex5 01 CC2018.png|500px]] |
| | + | |
| | + | |
| | + | '''2.''' In the Effects & Presets Panel, search for “Lens Flare” and double click it to apply it to your adjustment layer. |
| | + | |
| | + | [[File:Fig20 Ex5 02 CC2018.png|800px]] |
| | + | |
| | + | |
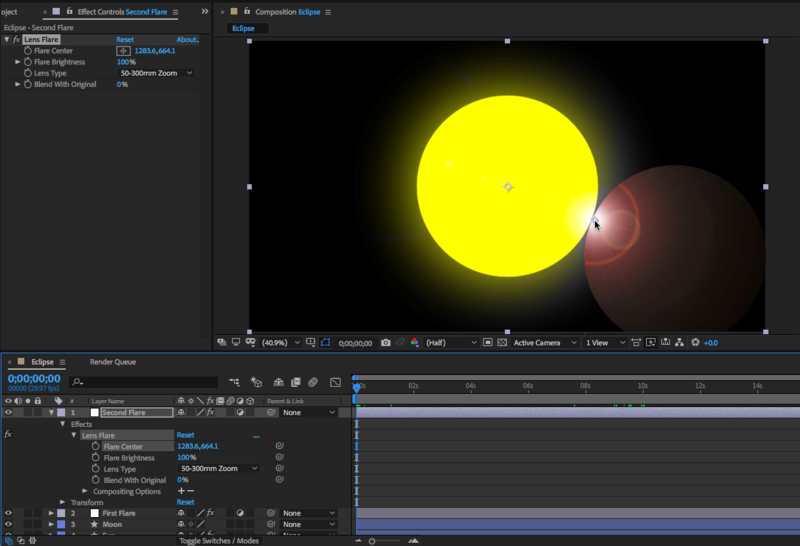
| | + | '''3.''' Under Effects > Lens Flare > Flare Center, change the the Flare Center position so that it is at the bottom left edge of the “Sun” layer. (See screenshot for reference) |
| | + | |
| | + | [[File:Fig20 Ex5 03 CC2018.png|800px]] |
| | + | |
| | + | |
| | + | '''4.''' Move the playhead so it is at the 10 second mark and create a Keyframe for the Flare Center. |
| | + | |
| | + | [[File:Fig20 Ex5 04 CC2018.png|800px]] |
| | + | |
| | + | |
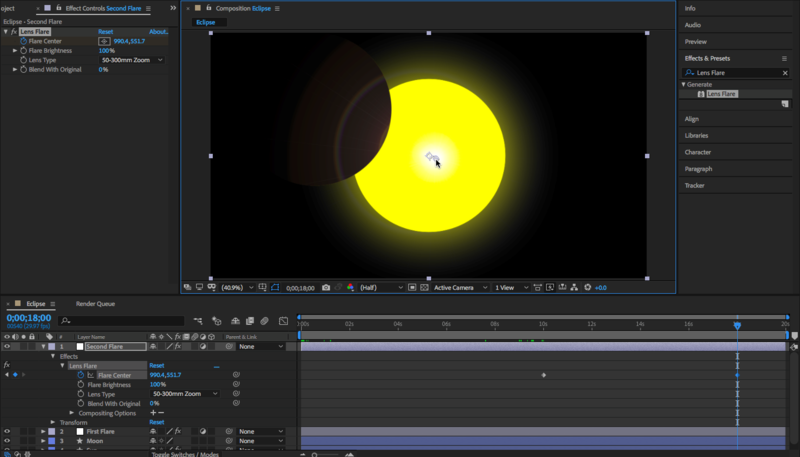
| | + | '''5.''' Move the playhead to the 18 second mark and change the Flare Center Position so that it is towards the center of the “Sun” shape. |
| | + | |
| | + | [[File:Fig20 Ex5 05 CC2018.png|800px]] |
| | + | |
| | + | |
| | + | '''6.''' Move the playhead to the 10 second mark and make a Keyframe for the Flare Brightness at 0%. |
| | + | |
| | + | [[File:Fig20 Ex5 06 CC2018.png|800px]] |
| | + | |
| | + | |
| | + | '''7.''' Move the playhead slightly right to the 10:15 second mark and make another Keyframe with the Flare Brightness at 150%. |
| | + | |
| | + | [[File:Fig20 Ex5 07 CC2018.png|800px]] |
| | + | |
| | + | |
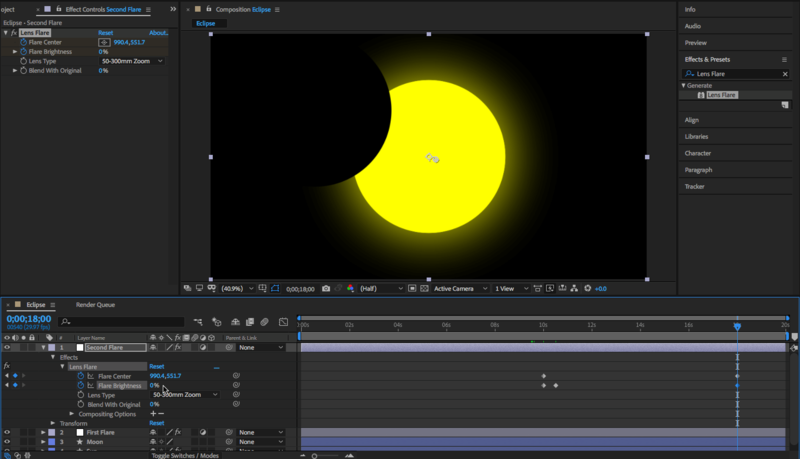
| | + | '''8.''' Then move the playhead to the 18 second mark and bring the value for the Flare Brightness down to 0% |
| | + | |
| | + | [[File:Fig20 Ex5 08 CC2018.png|800px]] |
| | + | |
| | + | |
| | + | '''9.''' Press SPACE to preview the composition. The moon should be transiting across the sun with the first lens flare growing in brightness then quickly disappearing once the moon is directly over the sun. As the Moon continues transiting across, the second lens flare grows then slowly disappears as the Moon leaves the frame. Some adjustments to the values keyframes may be needed if certain animation do not line up correctly. |
| | + | |
| | + | =Exercise 6 : Exporting and Rendering= |
| | + | |
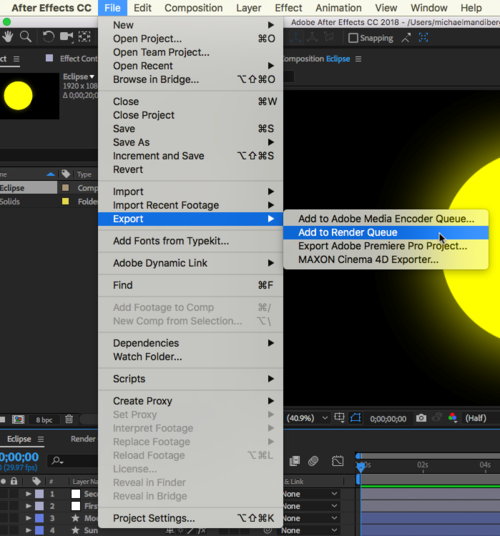
| | + | '''1.''' Exporting and rendering allows you to save the document in a format that the computer can read. In this example, we will go over two exporting methods, one through Adobe After Effects and another way through Adobe Media Encoder. First we will export through Adobe After Effects. Begin by clicking on File > Export > Add to Render Queue. |
| | + | |
| | + | [[File:Fig20 Ex6 01 CC2018.png|500px]] |
| | + | |
| | + | |
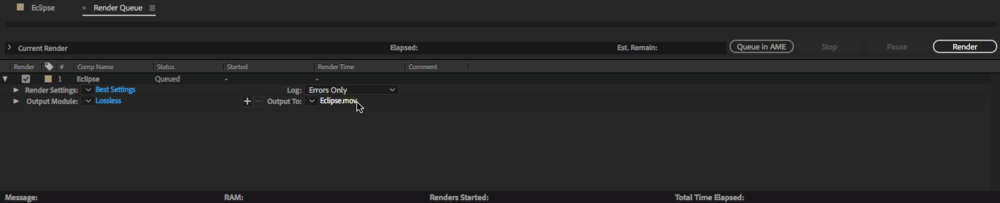
| | + | '''2.''' Notice that the Render Queue appeared at the bottom panel where the timeline used to be. Here we can see that our "Output to:" is a .mov file. This means that After Effects will export the composition as a .mov file which the computer can then read and play. |
| | + | |
| | + | [[File:Fig20 Ex6 02 CC2018.png|1000px]] |
| | + | |
| | + | |
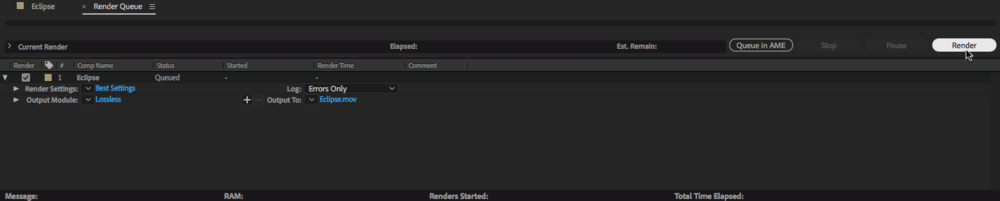
| | + | '''3.''' At the right side of the Render Queue Panel is the "render" button. Click on it to render the composition. This will bring up a window which will ask you where to save the .mov file. Select where you want it to save and press okay. The rendering process may take some time. |
| | + | |
| | + | [[File:Fig20 Ex6 03 CC2018.png|1000px]] |
| | + | |
| | + | |
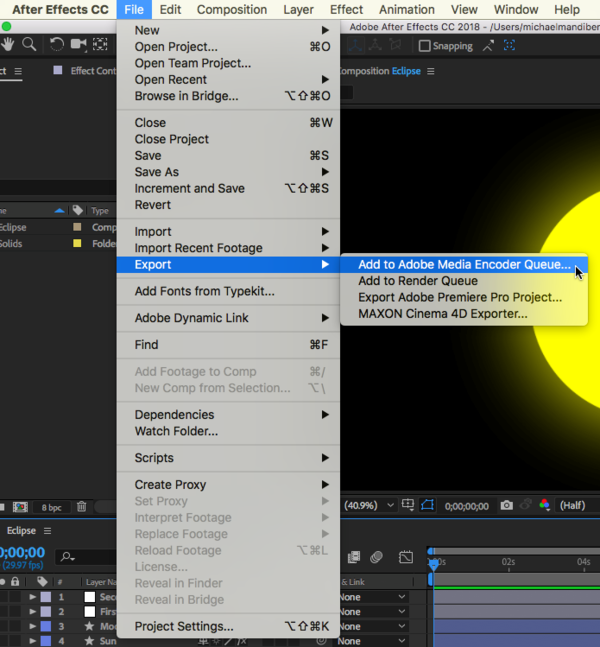
| | + | '''4.''' Now we will export and render our composition through Adobe Media Encoder. This will allow us to render the composition with a specific format and quality. Click on File > Export > Add to Adobe Media Encoder Queue... This will open up the program and immediately add it to the queue. |
| | + | |
| | + | [[File:Fig20 Ex6 04 CC2018.png|600px]] |
| | + | |
| | + | |
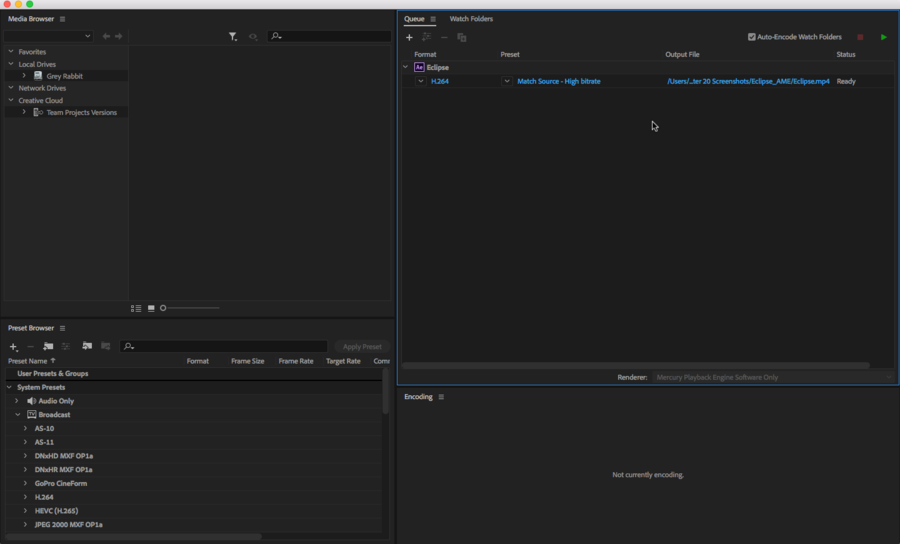
| | + | '''5.''' With Adobe Media Encoder open, we can see the queue at the right panel. |
| | + | |
| | + | [[File:Fig20 Ex6 05 CC2018.png|900px]] |
| | + | |
| | + | |
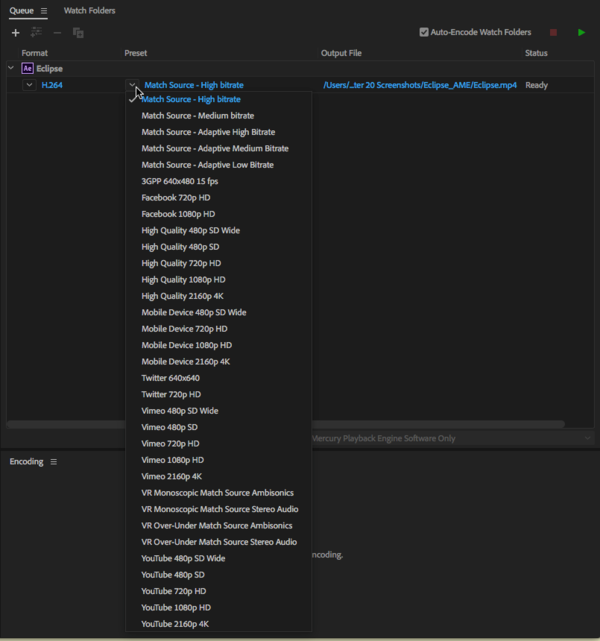
| | + | '''6.''' In the drop-down menu under preset, we can select the format and quality that the composition will export as. |
| | + | |
| | + | [[File:Fig20 Ex6 06 CC2018.png|600px]] |
| | + | |
| | + | |
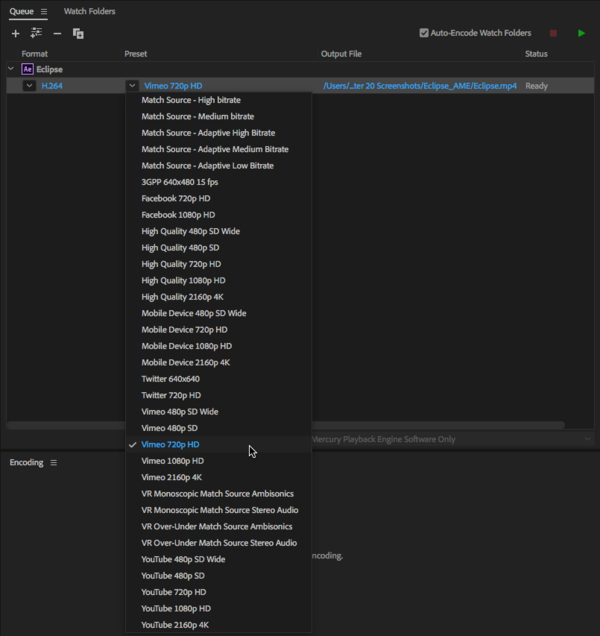
| | + | '''7.''' Select "Vimeo 720p HD" in the drop down menu. This will render the composition as an MP4 file in 720 pixels optimized for Vimeo. |
| | + | |
| | + | [[File:Fig20 Ex6 07 CC2018.png|600px]] |
| | + | |
| | + | |
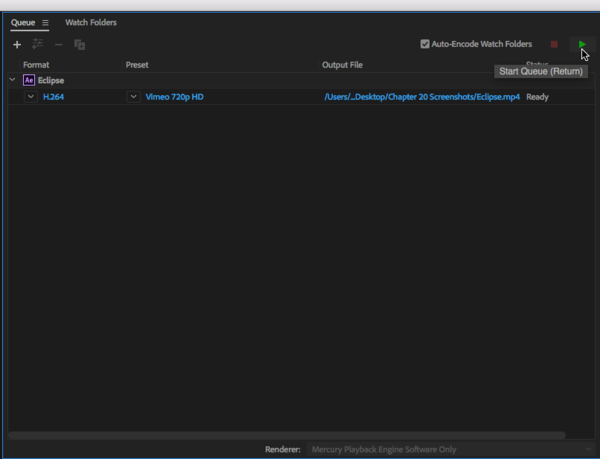
| | + | '''8.''' Under Output File, you can change the save location. Once all settings have been chosen and the status says "Ready." You can click on the "render" button at the top right to begin rendering. This may take some time. |
| | + | |
| | + | [[File:Fig20 Ex6 08 CC2018.png|600px]] |
| | + | |
| | + | |
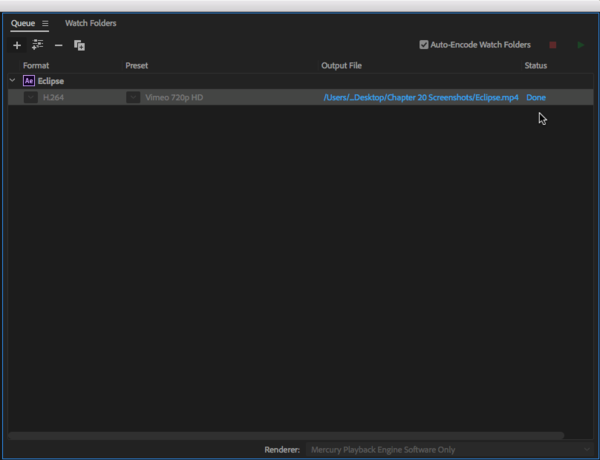
| | + | '''9.''' Once the render process has finished, the status should change to "Done." You may now go to the save location and preview your composition. |
| | + | |
| | + | [[File:Fig20 Ex6 09 CC2018.png|600px]] |
Chapter 20: Video
Exercise 1 : Draw Solar and Lunar Solid
1. Open Adobe After Effects. Select “New Project…” in the startup menu.
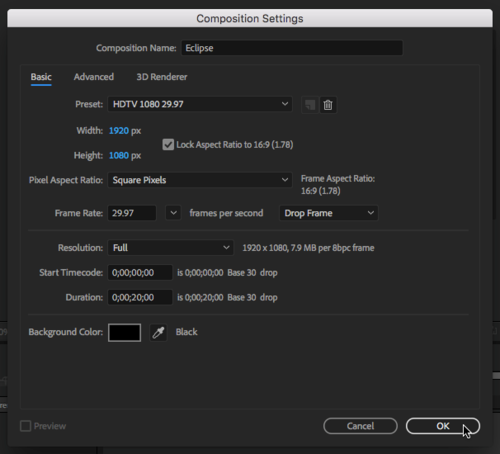
2. Select “New Composition.” Name the Composition “Eclipse” Make sure the width is set to 1920 px and the height is set to 1080 px. Set the frame rate by selecting 29.97 from the pull-down menu. Set the Duration to 20 seconds which is 0;00;20;00. Press OK.
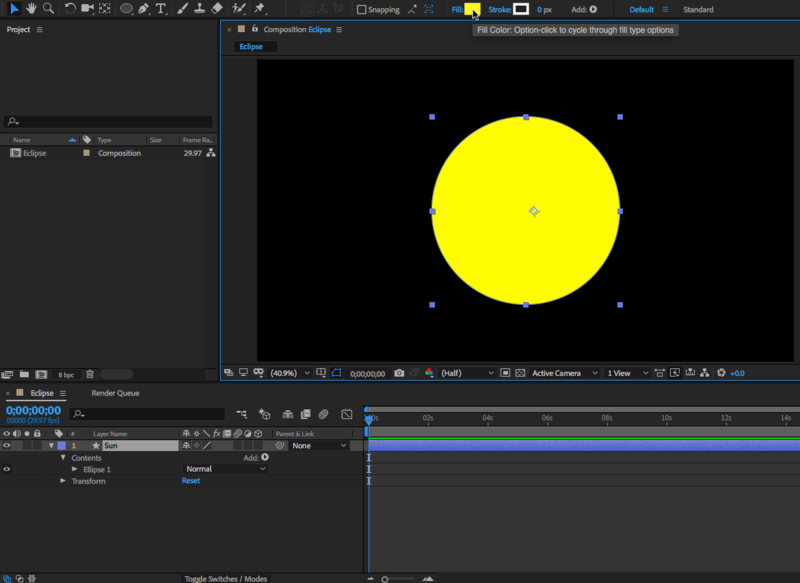
3. In the center of the comp create a circle by using the ellipse tool and name this layer “Sun.”
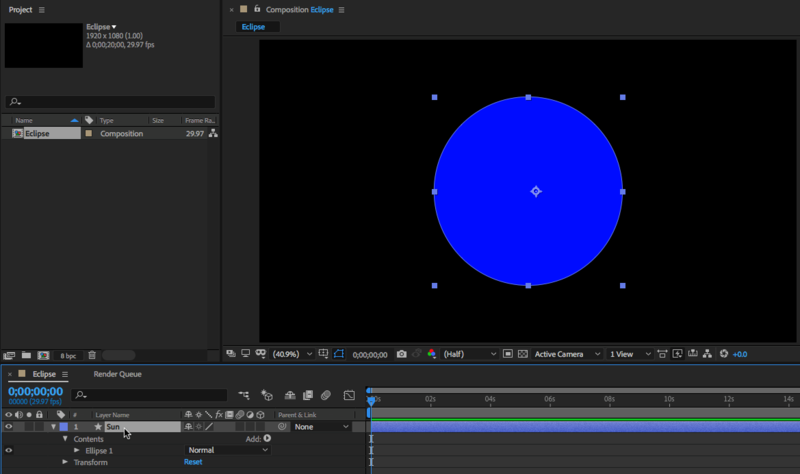
4. Change the shape so that the Fill Color is yellow and no Stroke Color.
5. Duplicate the “Sun” layer and rename the duplicate “Moon.”
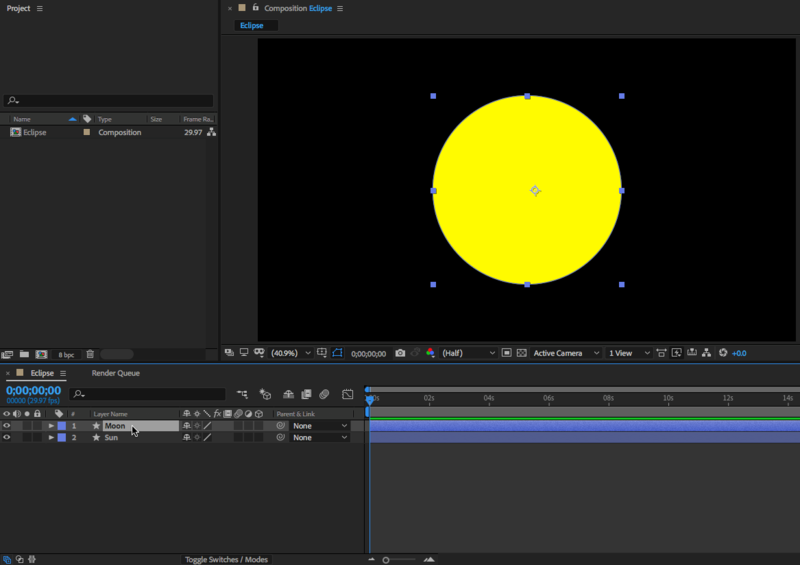
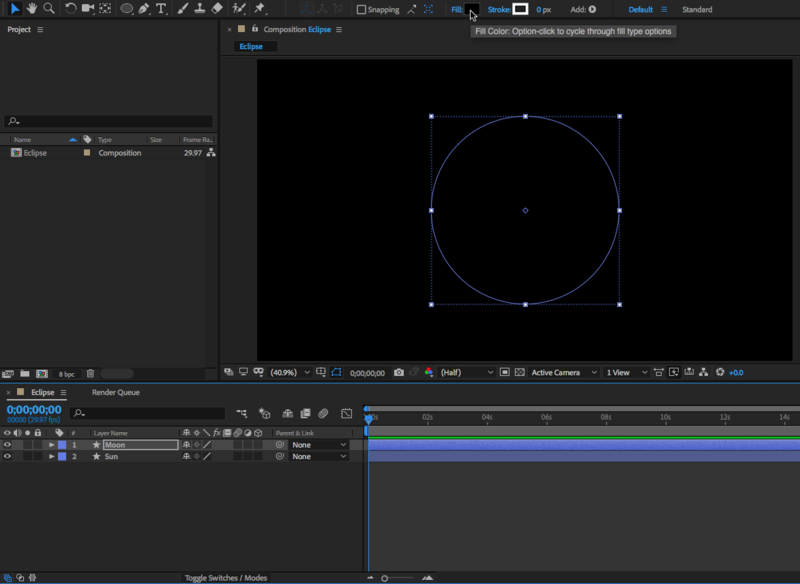
6. Change the Fill color of the “Moon” to black.
Exercise 2 : Add Glow Effect and and Keyframes
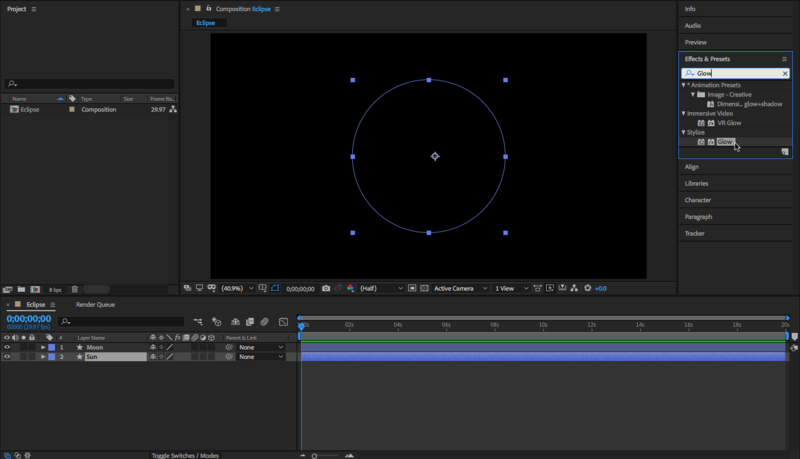
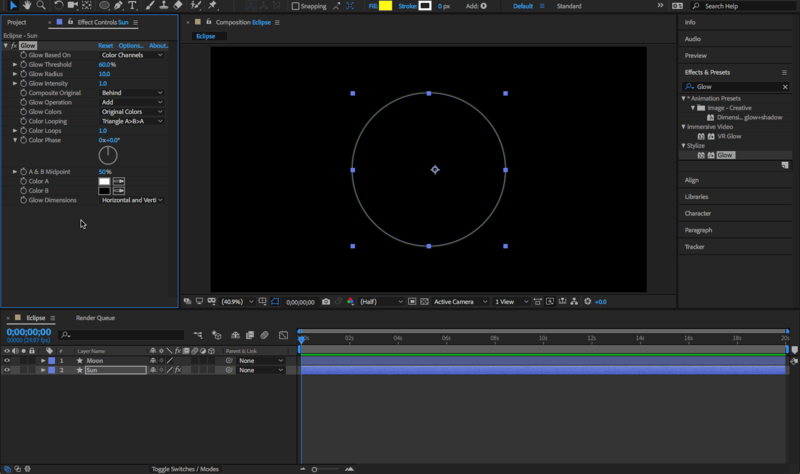
1. Select the “Sun” layer and search for the “Glow” effect in the Effects & Presets Panel.
2. Double click on the Glow effect to apply it to the “Sun” layer.
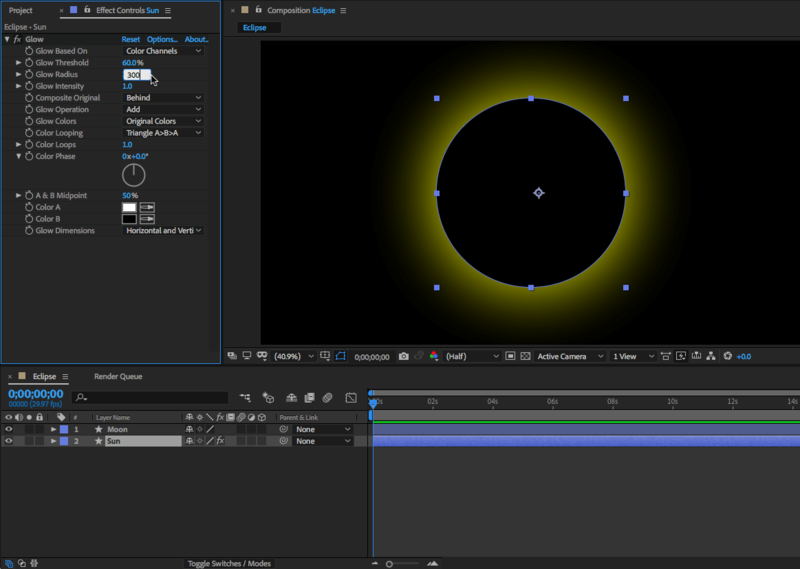
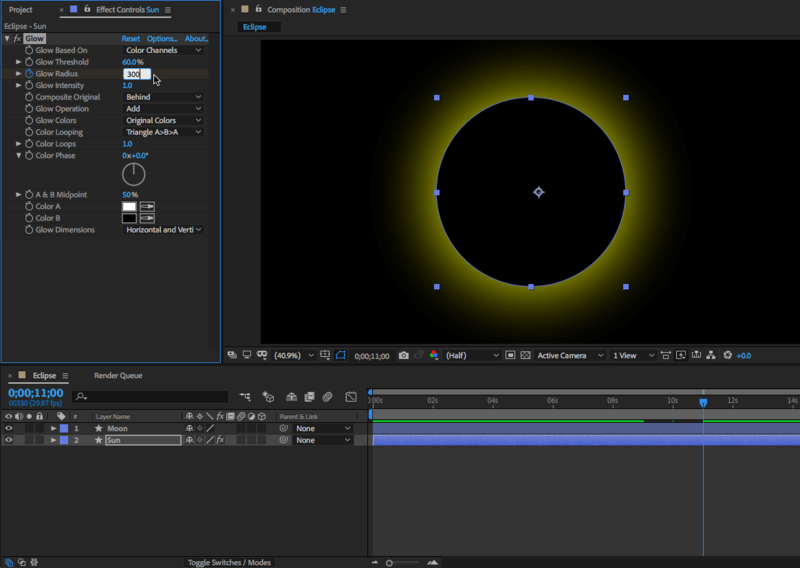
3. Under Glow > Glow Radius in the Effect Controls Panel, change the value to 300.
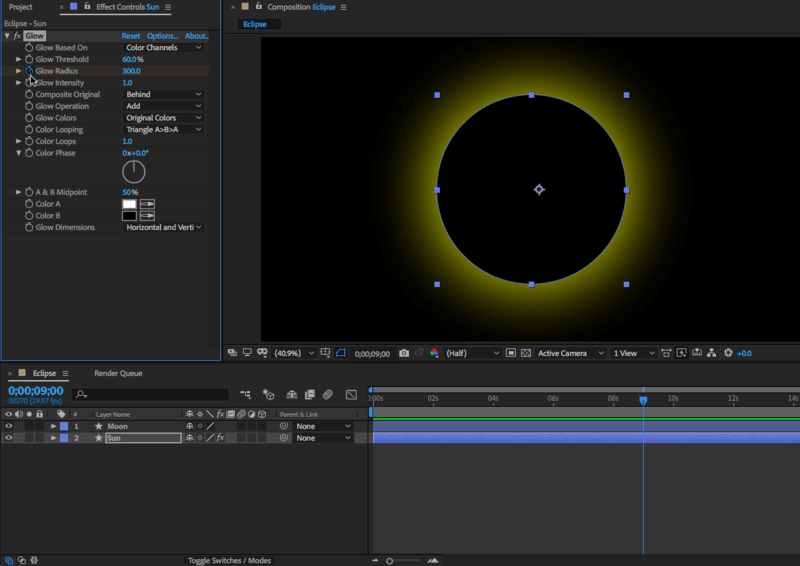
4. Go to the 9 second mark on the timeline and create a keyframe next to Glow Radius.
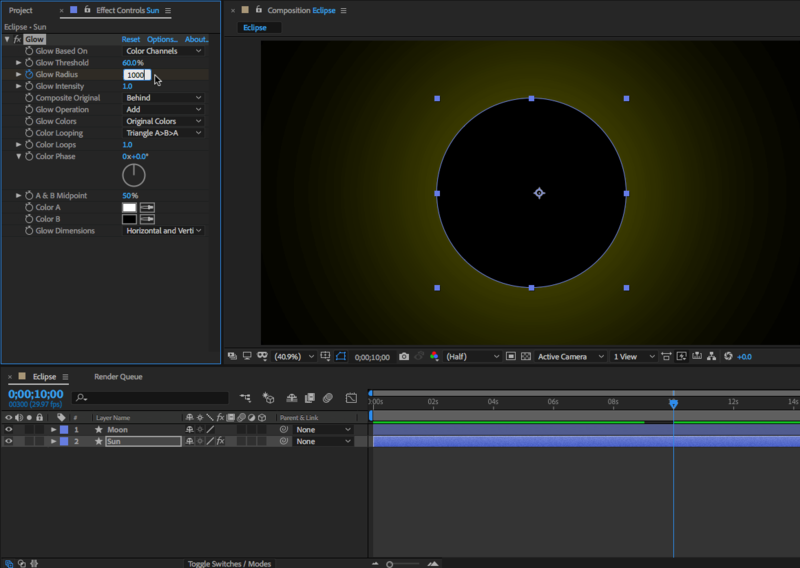
5. Move the playhead to the 10 second mark and change the Glow Radius to 1000.
6. Move the playhead to the 11 second mark and change the Glow Radius back to 300.
Exercise 3 : Animate Transit
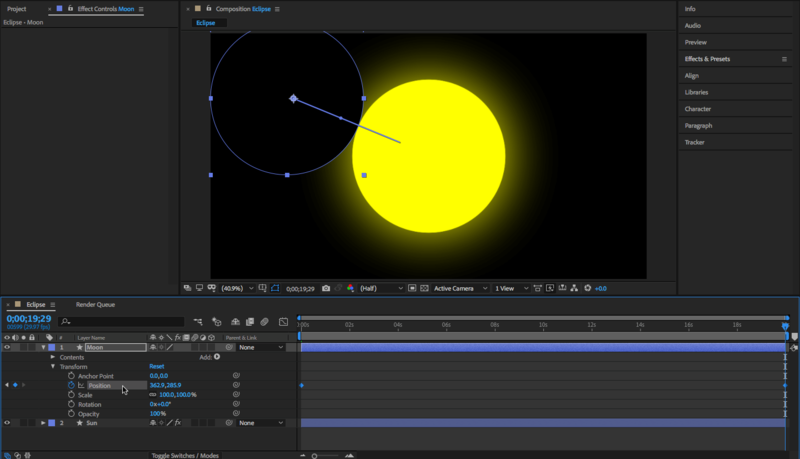
1. Move the playhead to the first frame. Move the “Moon” layer to the bottom right corner of the composition and make a Keyframe for position under Transform > Position.
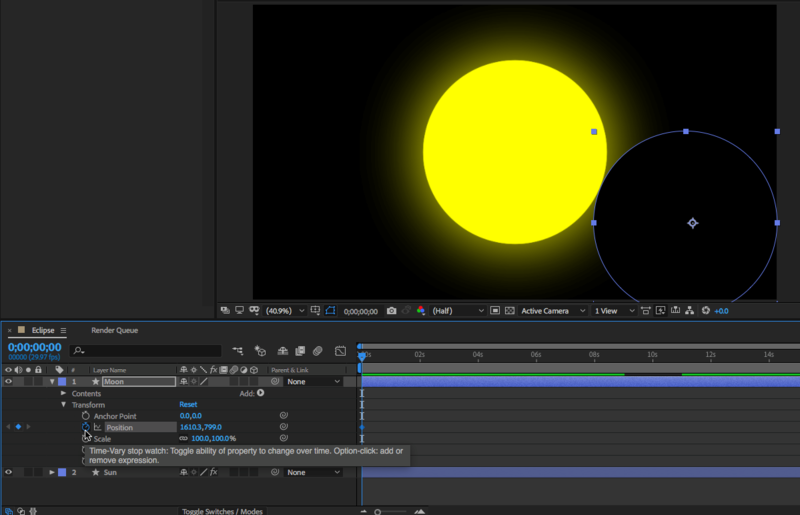
2. Move the playhead to the last keyframe and change the position so that the shape is at the top left of the composition.
3. Press SPACE to preview. This will make the “Moon” layer transit across the composition and create an eclipse.
Exercise 4 : Add First Lens Flare and Keyframes
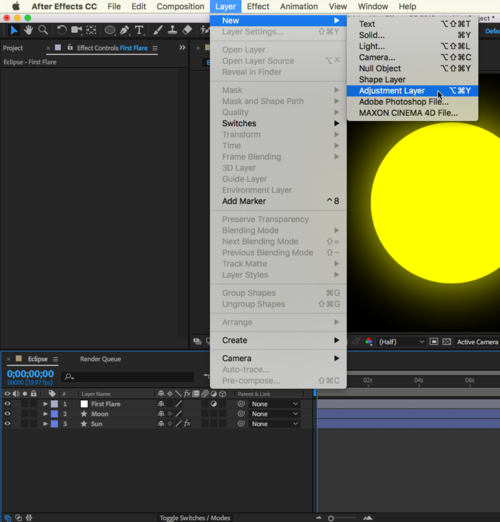
1. Create an adjustment layer by clicking on Layer > New > Adjustment Layer. Rename this layer “First Flare” and make sure it is the top layer in the Layers Panel.
2. In the Effects & Presets Panel, search for “Lens Flare” and double click it to apply it to your adjustment layer.
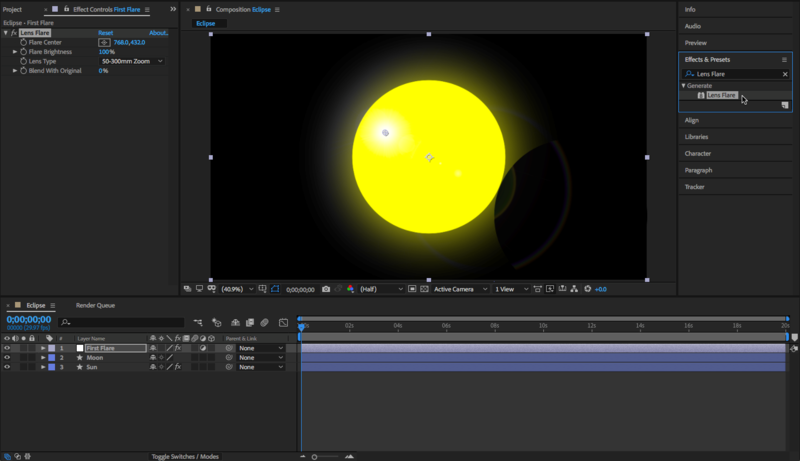
3. Under Effects > Lens Flare > Flare Center, change the the Flare Center position so that it is slightly above and to the left of the center of the “Sun” layer. (See screenshot for reference)

4. Move the playhead so it is at the 2 second mark and create a Keyframe for the Flare Center.

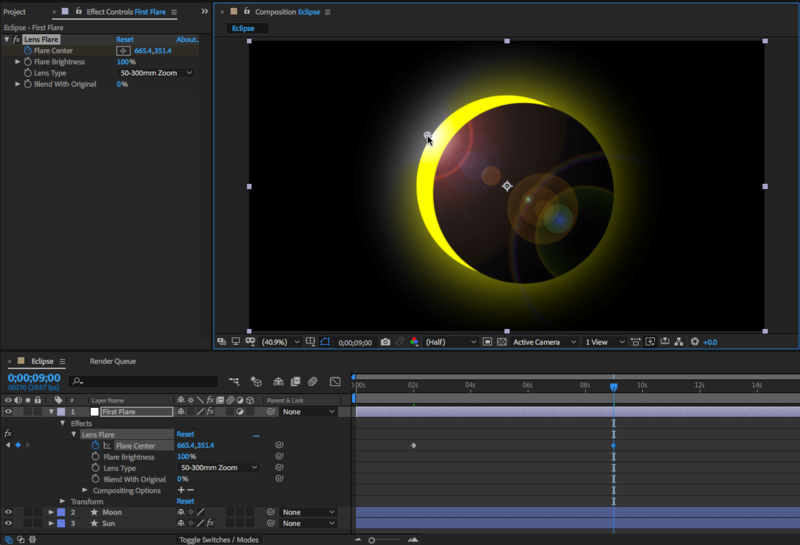
5. Move the playhead to the 9 second mark and change the Flare Center Position so that it is towards the upper left edge of the “Sun” shape.
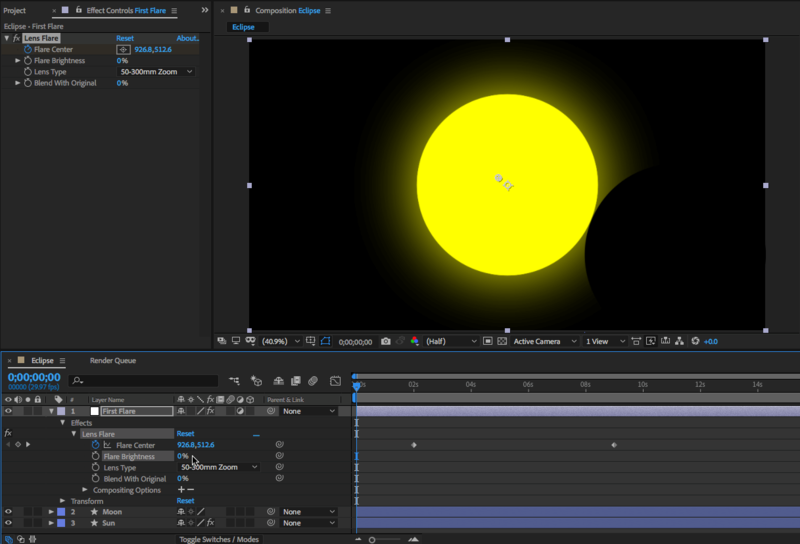
6. Move the playhead to the first frame and change the value of Flare Brightness to 0%.
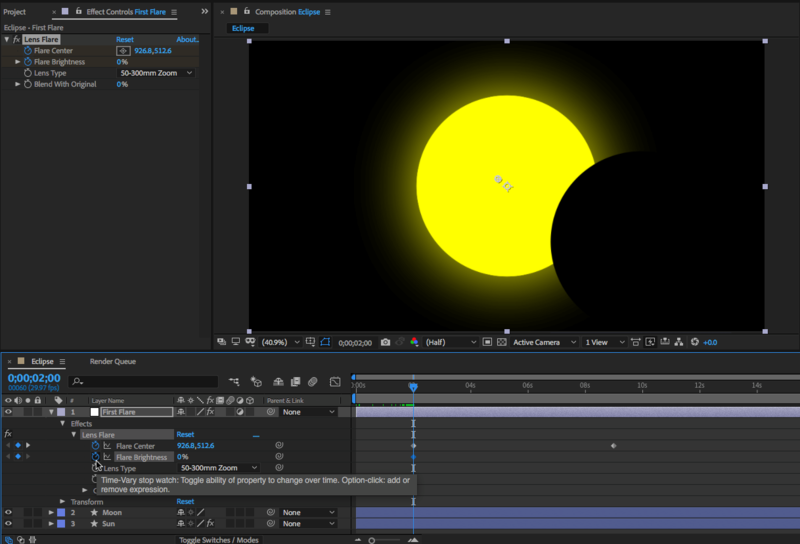
7. At the 2 second mark, make a keyframe for Flare Brightness.
8. Then move the playhead to the 9:15 second mark and bring the value for the Flare Brightness up to 150%.
9. Move the playhead to the 10 second mark and make another Keyframe with the Flare Brightness at 0%.
10. Press SPACE to preview the composition. The moon should be transiting across the sun with the lens flare growing in brightness then quickly disappearing once the moon is directly over the sun.
Exercise 5 : Add Second Lens Flare and Keyframes
1. Create another adjustment layer by clicking on Layer > New > Adjustment Layer. Rename this layer “Second Flare” and make sure it is the top layer in the Layers Panel.
2. In the Effects & Presets Panel, search for “Lens Flare” and double click it to apply it to your adjustment layer.

3. Under Effects > Lens Flare > Flare Center, change the the Flare Center position so that it is at the bottom left edge of the “Sun” layer. (See screenshot for reference)
4. Move the playhead so it is at the 10 second mark and create a Keyframe for the Flare Center.
5. Move the playhead to the 18 second mark and change the Flare Center Position so that it is towards the center of the “Sun” shape.
6. Move the playhead to the 10 second mark and make a Keyframe for the Flare Brightness at 0%.

7. Move the playhead slightly right to the 10:15 second mark and make another Keyframe with the Flare Brightness at 150%.

8. Then move the playhead to the 18 second mark and bring the value for the Flare Brightness down to 0%
9. Press SPACE to preview the composition. The moon should be transiting across the sun with the first lens flare growing in brightness then quickly disappearing once the moon is directly over the sun. As the Moon continues transiting across, the second lens flare grows then slowly disappears as the Moon leaves the frame. Some adjustments to the values keyframes may be needed if certain animation do not line up correctly.
Exercise 6 : Exporting and Rendering
1. Exporting and rendering allows you to save the document in a format that the computer can read. In this example, we will go over two exporting methods, one through Adobe After Effects and another way through Adobe Media Encoder. First we will export through Adobe After Effects. Begin by clicking on File > Export > Add to Render Queue.
2. Notice that the Render Queue appeared at the bottom panel where the timeline used to be. Here we can see that our "Output to:" is a .mov file. This means that After Effects will export the composition as a .mov file which the computer can then read and play.
3. At the right side of the Render Queue Panel is the "render" button. Click on it to render the composition. This will bring up a window which will ask you where to save the .mov file. Select where you want it to save and press okay. The rendering process may take some time.
4. Now we will export and render our composition through Adobe Media Encoder. This will allow us to render the composition with a specific format and quality. Click on File > Export > Add to Adobe Media Encoder Queue... This will open up the program and immediately add it to the queue.
5. With Adobe Media Encoder open, we can see the queue at the right panel.
6. In the drop-down menu under preset, we can select the format and quality that the composition will export as.
7. Select "Vimeo 720p HD" in the drop down menu. This will render the composition as an MP4 file in 720 pixels optimized for Vimeo.
8. Under Output File, you can change the save location. Once all settings have been chosen and the status says "Ready." You can click on the "render" button at the top right to begin rendering. This may take some time.
9. Once the render process has finished, the status should change to "Done." You may now go to the save location and preview your composition.